

you will need:
Fabric 110 cm wide
EU 32-54 4 m
Fabric 140 cm wide
EU 32-40 2.5 m
EU42-54 2.9 m
Thread
Piping
Zipper 35 cm (optional, you can get it over your head without a zipper)
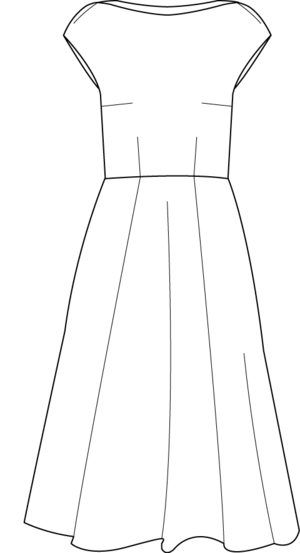
No. 00 Danmark - Version 5
This model is a combination of No. 5 Aalborg. Together it makes a beautiful dress perfect for every day or a special occasion.
Fabric choice:
Light to medium weight woven fabric. Cotton, Silk, Wool, Viscose, Cupro, Linen or Polyester The final look of the garment will depend on the type of fabric you choose. Not suitable for jersey.
Find Your Size:
Take your measurement according to the measurement chart. Choose the size closest to your measurement see measurement chart in your PDF file.
Fitting:
We recommend that you always make a muslin before you cut the fashion fabric, to make sure your finished style will fit you perfectly.
Combining the patterns
Here I’ll show you how to join the blouse to the no. 5 skirt. You have to move the darts in this version, so they align with the lines on the skirt.
When you choose the size for the skirt, go up a size. If you fit a size 42 with the blouse, use a size 44 for the skirt. If you fit a size 54, take the skirt from size 54 and add 1.7 cm to each side seam.
1. You have to work on both the front and the back piece
1 cm below the waist, make a perpendicular line to CF and CB on both pieces.
Cut the red line
2. Move the darts on both front and back piece.
Move as shown on the drawing.


How to change the neckline
1. Draw the new neckline
⦁ Tape front and backpiece in the shouldersesam
⦁ From the frontside, draw a line from the neckline and over on the backside approx. 4 cm down on the armseye. The line has to go over at the point where the front and back piece meet. This line is reed
⦁ Draw a line on the backside that meets the reed line. This line is green.

2. Cut and paste
⦁ Cut in the red and green line. Now you have 5 pattern pieces.
⦁ Remove the two small pieces from the neckline.
⦁ The back piece is done
⦁ Tape the small piece onto the frontpiece. They have to be in line on approx. 3 cm

3. Finish the pattern pieces
⦁ Draw seam allowance in the shoulder and in the dart.
⦁ The grainline is parallel to the CF and CB

Cutting Fabric
On each pattern piece you will find a capital letter. On the cutting layout plan, you will find the same capital letters so that you can easily see which pattern pieces to use for the view you have chosen.


Sewing
NB! THE PATTERN HAS 1 CM SEAM ALLOWANCES INCLUDED, UNLESS OTHERWISE NOTED.
1. Begin by cutting all your pieces according to the cutting layout plan.
2. Finish the seam allowances on all the long sides of the skirt.
Sew The Skirt
3. Sew the skirt together in the long seams, right sides together. Sew according to the notches. Make a front and a back piece.
4. Sew the front and back piece together at one side, right sides together.

5. Sew the other side together 20 cm from the bottom and upwards. This will be your left side.
6. Finish the hem with a narrow hem: Fold 0.5 cm + 0.5 cm. See how to here

NOTE! Now You Have A Skirt Part And It Is Time To Sew The Bodice:
Bodice
7. Sew the darts on the back piece according to the markings on the pattern piece. Press them towards centre-back.
8. Sew the darts on the front piece according to the markings on the pattern piece. Press the waist darts towards centre-back and the bust darts upwards.
9. Sew the darts on the shoulders according to the markings on the pattern piece. Press the darts towards the back.
10. Finish the seam allowances of the back and front side seams.

11. Place the piping on the right side of the neckline, right sides together. See a picture DIY here:
12. With a zipper foot, sew as close to the piping edge as you can get.
13. Finish the raw edges, all layers together

14. With a zipper foot topstitch from the right side, 0.2 cm from the piping.

15. Sew the piping to the shoulder and the front neckline, right sides together. See picture DIY of point 15-17

16. Sew the back piece to the front piece in the shoulder seams.
17. Press the seam allowances to the wrong side and top stitch, using a zipper foot , 0.2 cm from the piping. Sew all the way from one side of the shoulder to the other side.
18. Sew the back piece to the front piece in the right side seam.
19. Sew the back piece to the front piece in the left side seam 5 cm down from the underarm.
20. Pin the piping to the right side of the armscye. See a picture DIY of point 20-25
21. The piping ends must overlap at the underarm.
22. Sew the piping to the armscye. Follow the shape of the armscye and sew over the piping.
23. Cut away the ends of the piping.

24. Finish the seam allowaces.
25. Press the seam allovances to the wrong side and topstitch 0.2 cm from the piping, using a zipper foot. Sew all the way from one side of the shoulder to the other side.
26. Sew the bodice to the skirt at the waist, right sides together. The dress is still open in the left side seam.

27. Finish the waist seam and press the seam allowances upwards.
28. Sew in the zipper. The zipper starts 5 cm under the arm. You can see a video on how to sew in a zipper in the online instructions.
29. Finish the rest of the side seam.