You will need:
Fabric 140 cm wide
EU 32-44/UK 4-16/US 0-12 1.8 m
EU 46-54/UK 18-26/US 14-22 2 m
Thread
Invisible zipper 25 cm
Buttons for cuffs 6 pieces (1,5 cm in diameter)
Interfacing (that works with your fabric) 30 cm
No. 29 Milano - Version 2
Blouse with long bishop sleeves, empire cut and a high collar with gatherings. The blouse is closed with an invisible zipper in the side seam.
Fabric choice:
Light to medium-weight woven fabric: cotton, silk, wool, viscose, cupro, linen or polyester. Not suitable for jersey fabrics.
Find Your Size:
Take your measurements according to the measurement chart. Choose the size closest to your measurement. Print the measurements chart here.
Fitting:
We recommend that you always make a muslin before you cut the fashion fabric, to make sure your finished style will fit you perfectly.
Cutting Fabric
On each pattern piece, you will find a capital letter. On the cutting layout plan, you will find the same capital letters so that you can easily see which pattern pieces to use for the view you have chosen.
YOU WILL NEED THE FOLLOWING PATTERN PIECES:
A,B,C,D,E,h,i
Sewing
NOTE! The Pattern Has 1 Cm Seam Allowances Included Unless Otherwise Noted.
1. Cut all your pieces in fabric and interfacing as needed.
2. Press interfacing to all cuffs (E)
3. Sew the darts on the back bodice (B) and the back (I) right sides together. Fold according to the markings.
4. Press the dart on the bodice towards the centre back and the dart on the skirt towards the side.
5. Finish the straight (unnotched) side of the collar (C) with a narrow hem. Fold 0.5 cm, then 0.5 cm, then stitch.
6. Finish the seams of:
· Side and shoulder seams on the front and back bodice (A and B)
· Side seams of the front and back (H and I)
· Sleeve seams (D)
You can finish by overlocking or sewing a zig-zag stitch close to the edge or finish with a bias tape.
Sew the bodice
7. Sew front and back pieces together at shoulder seams, with right sides together. Press seams open.
8. Sew the collar to the neckline, right sides together. Match the notches to the shoulder seams and the ends at the seamline.
9. Finish the seam - by overlocking, a zig-zag or with a bias tape. Press towards the collar.
10. Sew front and back pieces together at the left side seams, right sides together. Press seams open.
11. Make a gathering stitch 0.5 cm and 1.5 cm from the edge of the collar to the second notch on the front bodice (closest to the side seam) (A, C).
Sew the sleeves
12. Make a narrow hem between the notches at the bottom of the sleeve (D). Fold 0.5 cm, then 0.5 cm, then stitch.
13. Sew the inner seam, right sides together. Press the seam open.
14. Make a gathering stitch between the notches at the sleeve head and the bottom of the sleeve.
15. Sew one pair of cuffs together at the bottom (shorter edge), right sides together. Repeat on the second pair.
16. Understitch the seam to the inside cuff. Note! When understitching, you must make a mirror pair to get a left and a right cuff.
17. Gather the sleeve bottom to match the cuff, starting 1 cm from the raw edge at the side with no notch and ending at the other side with the notch. The centre notch matches the sleeve seam.
18. Place the right side of the cuff (E) with the understitch to the wrong side of the sleeve, matching notches. The front of the sleeve (the front has one notch at the sleeve head) is paired with the notch on the cuff. Place the backside (the back has two notches at the sleeve head) of the sleeve 1 cm from the raw edge– leaving a seam allowance to sew the cuff together. Sew the sleeve to the cuff.
19. Remove the gathering stitch. Press the seam allowance towards the cuff.
20. Fold and pin the cuff with right sides together, turn the seam allowance from the seam you made in step 18 towards the cuff, see illustration. Sew the outer edge of the cuff, both the under- and overlap.
The underlap is illustration 1: sew from the cuff edge ending at the seam between cuff and sleeve. Remember to backstitch.
The overlap is illustration 2: Sew from the side and connect with the stitching from step 18 (the overlap)
21. Turn the cuff and clip notches and corners if necessary. Press all the seam allowance into the cuff.
22. Pin the pressed edge to the sleeve and close the cuff completely by topstitching 0.2 cm from the folded edge.
Sew the bottom
23. Sew the front and back together, right sides together, at the left side seam on both the bodice and bottom. Press the seams open.
24. Pin the bodice to the bottom, right sides together. Matching side seam, darts at the seam line, and notches. Match the collar at the centre front so the two collars meet at the centre front. Gather the front bodice to fit between the notches on the front skirt.
25. Sew the waist seam from the bodice side so that it is easier to control the gathering.
26. Finish the waist seam by overlocking a zig-zag or with a bias band. Press the seam downwards.
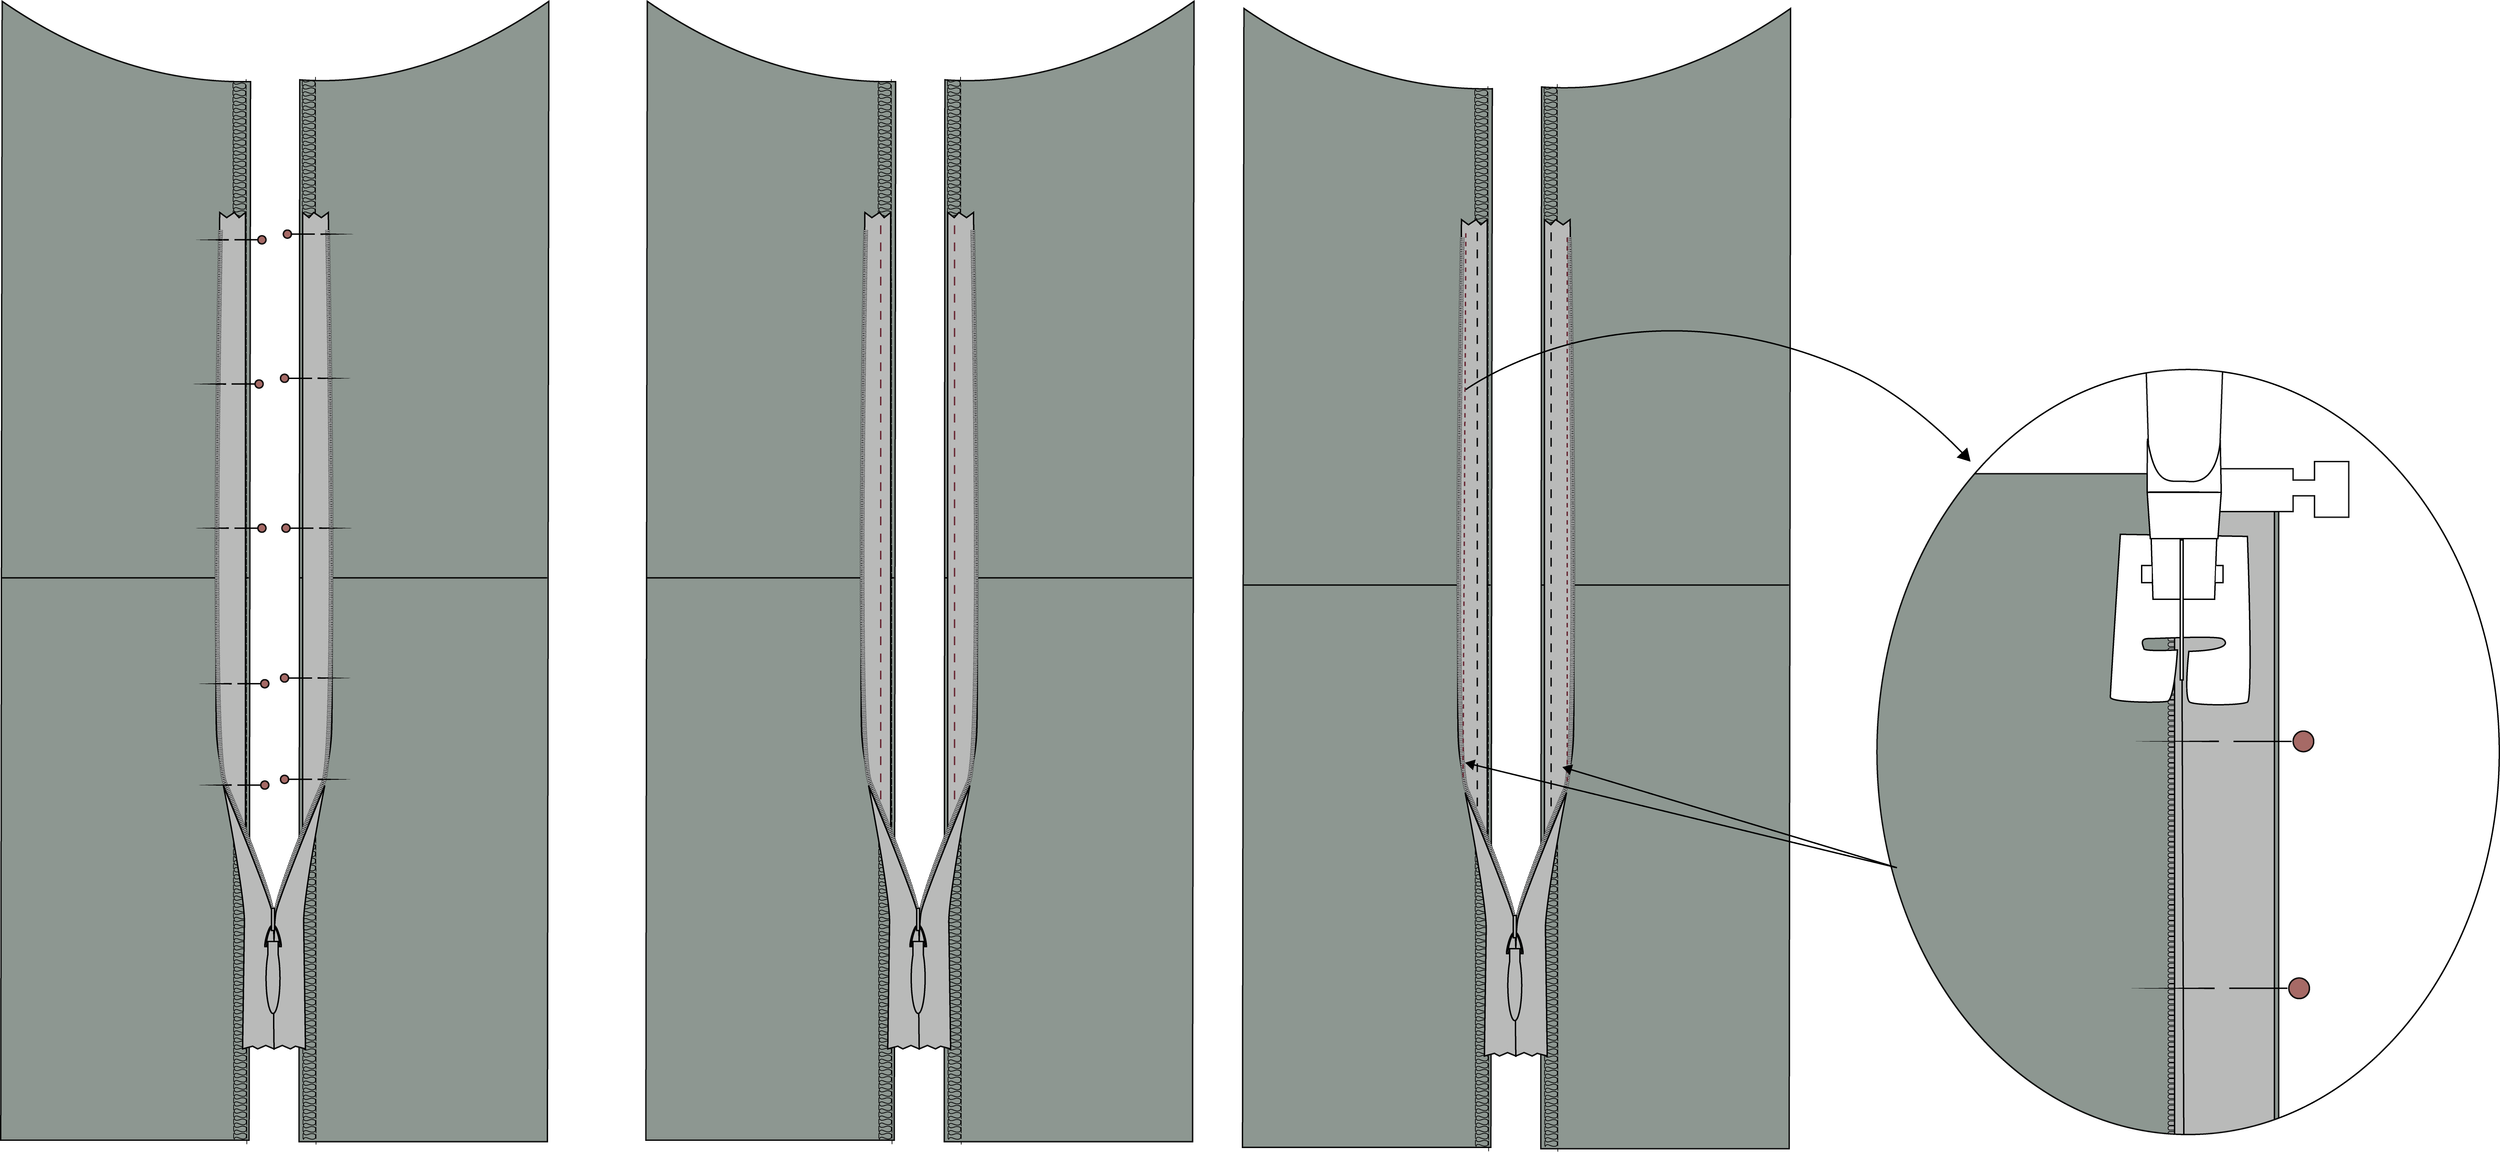
Sew the invisible zipper in
27. Place the right side of the zipper allonge the edge of the sideseam 5 cm. under the arm.
28. Base stitch the zipper to the blouse and align the waist seam on both sides of the zipper.
29. Flip the teeth of the zipper aside and sew the zipper in place.
30. Sew the side seam seam above and below the zipper.
31. Press the seam open and press gently on the zipper from the right side.
32. Sew the sleeve to the armscye, matching the notches and gathering excess fabric at the sleeve head.
33. Finish the sleeve seams and press the seam allowance towards the sleeve.
34. Hem Hem the blouse by folding 0.5 cm x 0.5 cm and stitch along the folded edge.
35. Make buttonholes to the cuffs. Place according to the markings on the pattern.
36. Sew in the buttons.


