

You will need:
Fabric 120 cm wide
EU 32-38/UK 4-10/US 0-6: 3 m
EU 40-42/UK 12-14/US 8-10: 3.20 m
EU 44-48/UK 16-20US 12-16: 3.40 m
Fabric 140 cm wide
EU 32-40/UK 4-12/US 0-8: 2.80 m
EU 42-48/UK 14-20/US 10-16: 3.10 m
EU 50-54/UK 22-26/US 18-22: 3.50 m
Pocket lining 0.35 m
Interfacing 0,50 m
5 Buttons - approx. 2-2,5 cm in diameter.
Thread
Elastic thread for shirring
1m elastic 1 cm wide - we recommend underwear elastic
Heat or water-erasable pen for shirring
No. 34 San Marino - Version 2
This jumpsuit is inspired by the feminine style of the 1940s and how women wore leisurewear. Its relaxed fit and refined detailing make it perfect for both a day at the beach and an evening event.
This jumpsuit has wide legs that closes at the center front with a buttoned placket. The piece has welt pockets at the side seams, elastic shirring at the back, and wide shoulder straps.
Fabric choice:
Light weight woven fabric: cotton, silk, wool, viscose, cupro, linen or polyester. Not suitable for jersey.
Find Your Size:
Take your measurements according to the measurement chart. Choose the size closest to your measurement. Print the measurements chart here.

Fitting:
We recommend that you always make a muslin before you cut the fashion fabric, to make sure your finished garment will fit you perfectly.
Cutting Fabric
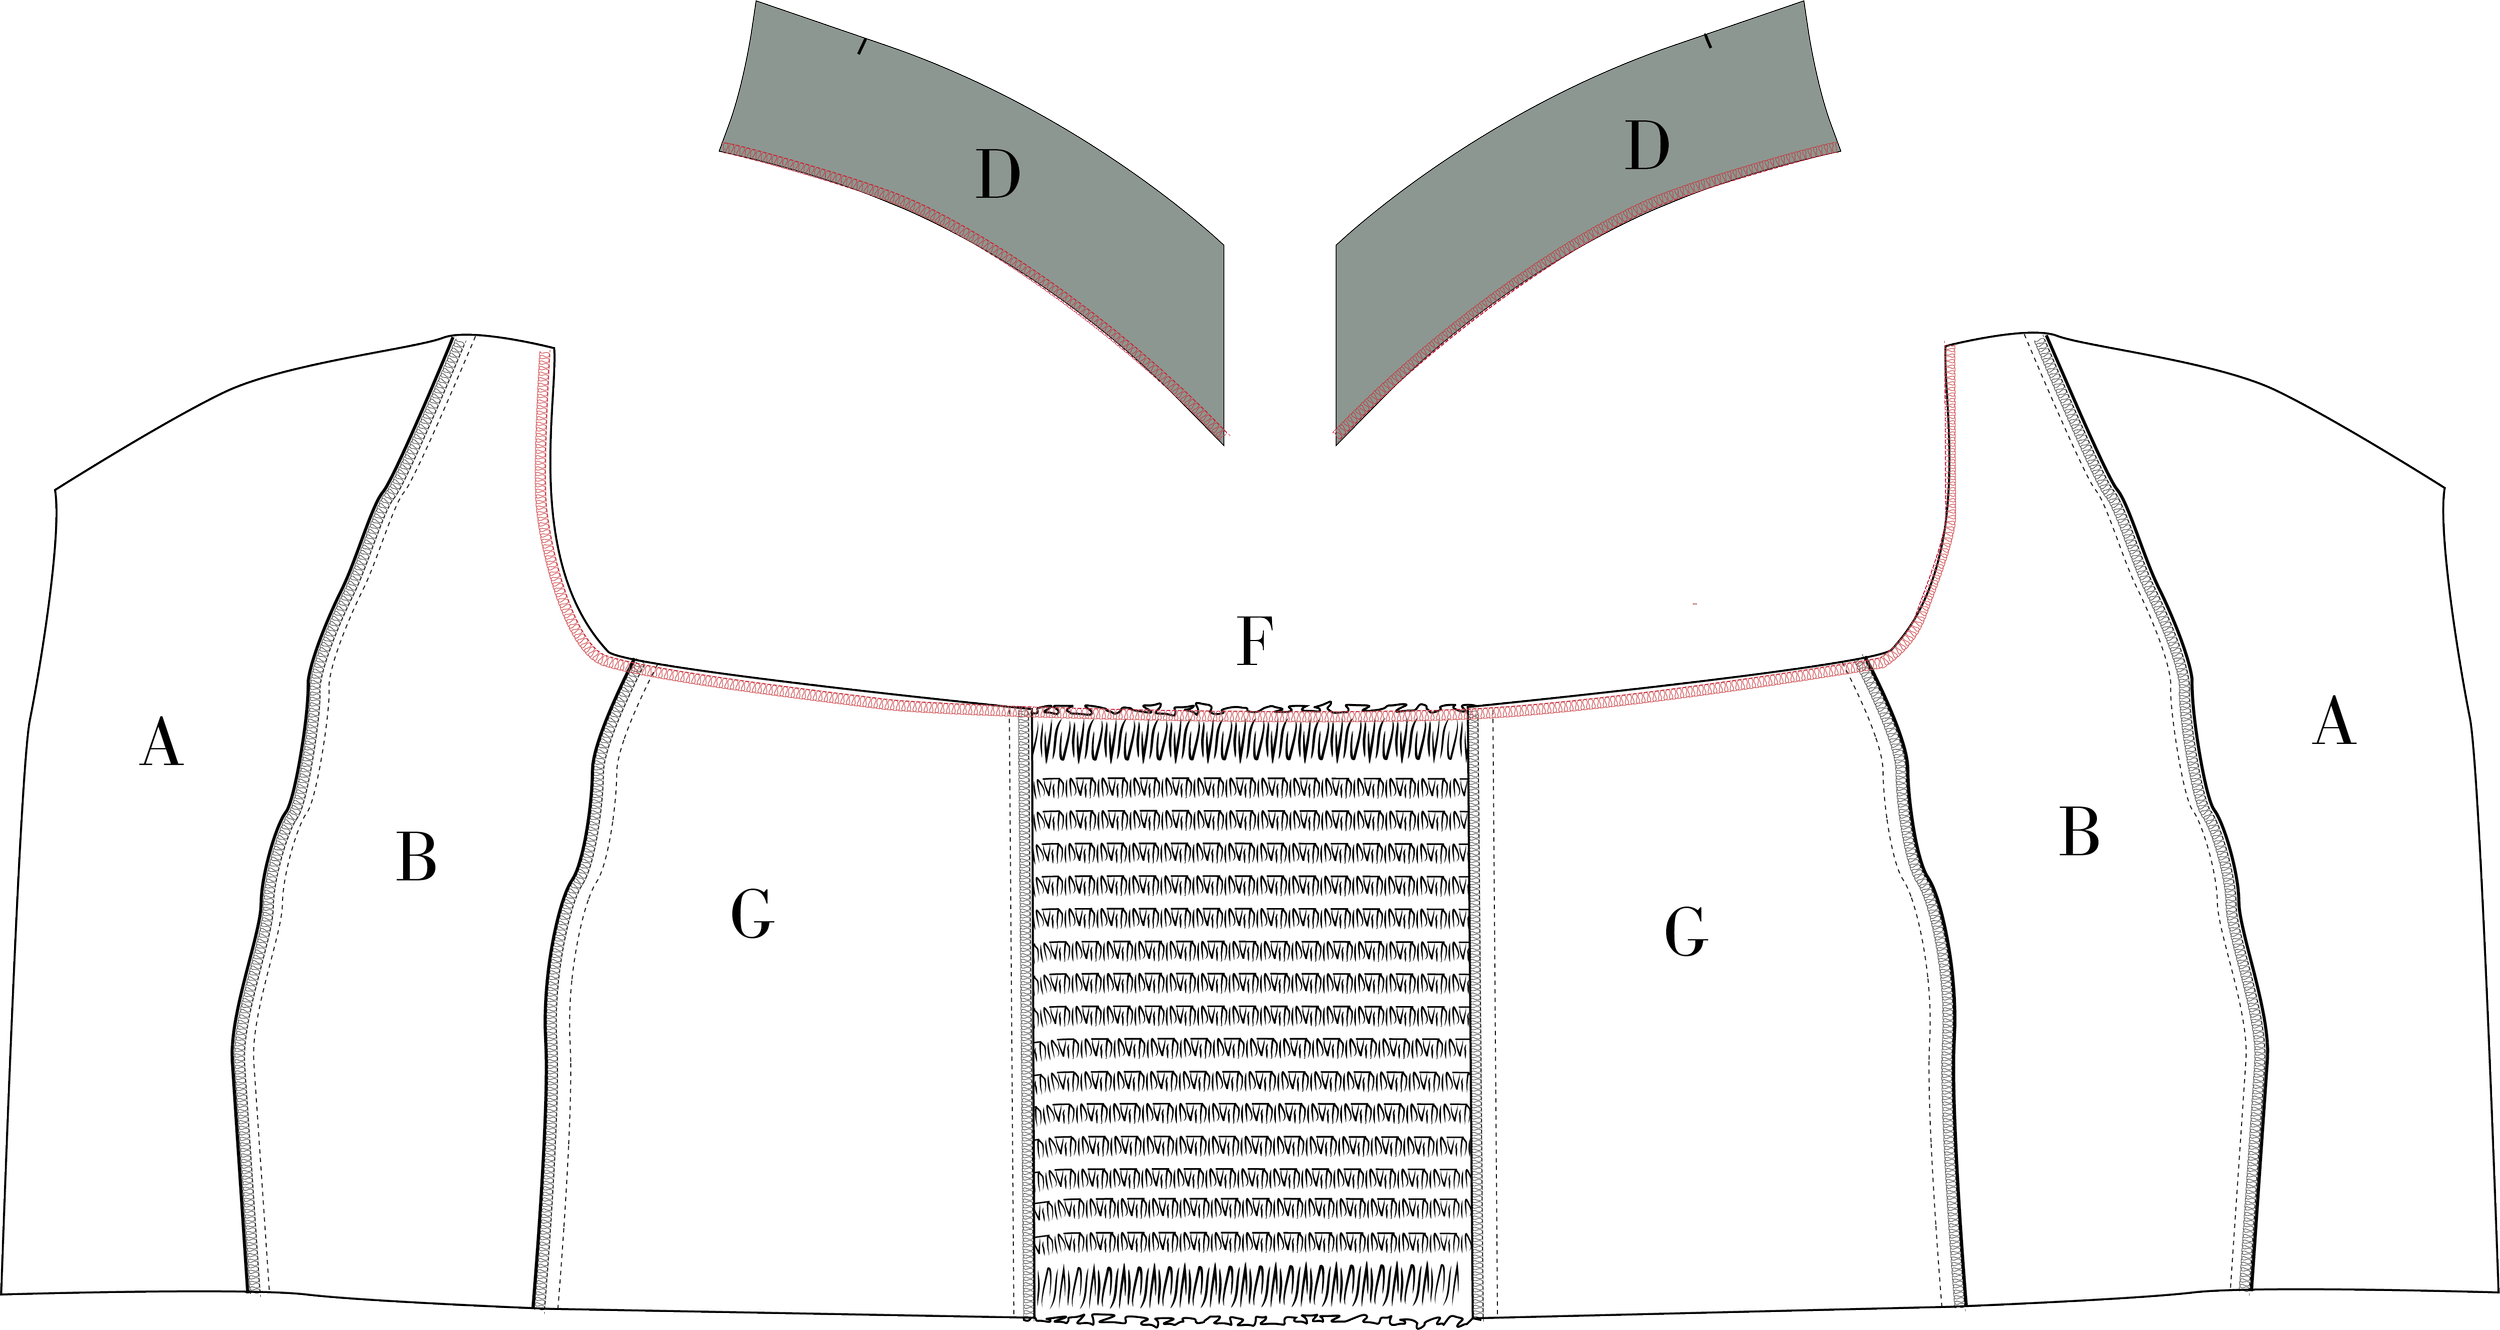
On each pattern piece, you will find a capital letter. On the cutting layout plan, you will find the same capital letters so that you can easily see which pattern pieces to use for the view you have chosen.

YOU WILL NEED THE FOLLOWING PATTERN PIECES:
A, B, C, D, F, G, H, I, J, K, L, M, N, O


Sewing
NOTE! The Pattern Has 1 Cm Seam Allowances Included Unless Otherwise Noted.
1. Cut all pieces in fabric, pocket lining and interfacing. Remember to transfer all notches and markings to the fabric. (Watch the YouTube video on how to mark notches.) see video
2. Press interfacing onto the following pieces:
Placket (C)
Facing (D)
Pocket welt (K).
3. Press small pieces of interfacing (approx. 2 x 2 cm) onto the pocket corners and the end of the crotch seam on the front pants (I).

TOP - Smocking and Assembly
4. Start by sewing elastic smocking on the back piece (F). See video
Use a heat or water-erasable pen to draw lines on the right side of the fabric as sewing guide lines. The first line is 2 cm from the top (widest part), then continue with 1 cm spacing down to 2 cm from the bottom. Watch the video on how to sew smocking.
Wind the elastic thread onto the bobbin by hand. Do not stretch the thread while winding. Set stitch length to approx. 3.5–4 mm. Do a sewing test to check what works on your machine.
Stitch on the right side along the drawn lines. Do not cut the thread at each end—sew to the end of the fabric, lift the presser foot, pivot the fabric, and sew back on the next line.
Steam the smocked piece using your iron without touching the fabric directly.

NOTE! After smocking, reset your machine to a standard stitch length of approx. 2.5 mm.
5. Sew the bodice front piece (A) to the bodice front side piece (B), right sides together.
6. Sew the bodice back pieces (F) to the bodice side back pieces (G), right sides together.

7. Sew front and back bodice pieces together at the side seams, right sides together.
8. Finish all seams using an overlock, zigzag or bias binding. Press side and front seams toward center front. Press back seams toward center back.

9. Finish the bottom edge of the facing (D) – the edge without notches – with overlock, zigzag, or bias binding.
10. Finish the top edge of the bodice from armhole to armhole using an overlock or zigzag stitch. Do not stretch the smocked piece.
13. Sew the straps (H) right sides together along the long sides. Make two straps.
14. Turn the straps right side out and press. Optional, you can topstitch 5 mm from the edge on both sides.

15. Measure the overlocked top edge from armhole to armhole with the smocking relaxed. Cut a piece of elastic approx. 1/3 shorter.
16. Place the elastic on the wrong side of the top along the overlocked edge as follows: (See video)
Fold the elastic in half and pin the midpoint to the center of the smocked back piece.
Pin across the back, allowing natural gathering (do not stretch smocking).
Position one end of the elastic 1.5 cm from the point of the side front.
Stretch and pin the elastic across the armhole and side back.
Sew the elastic in place using a straight stitch close to the inner edge.

17. Place the strap with the angled end 1 cm from the armhole edge, placing so the strap is angled away from center front.

18. Place the facing right sides together with the top, sandwiching the strap between. Sew along the top edge.
19. Fold the facing upward and under stitch.

20. Fold the facing right sides together and sew the corner. Trim and turn right side out.

21. Secure the facing to the seam allowance at center front.
22. Fold the elastic edge to the inside and topstitch 0.7 cm from the fold.

POCKETS
23. Fold the pocket welt (K) in half lengthwise, wrong sides together, and press.
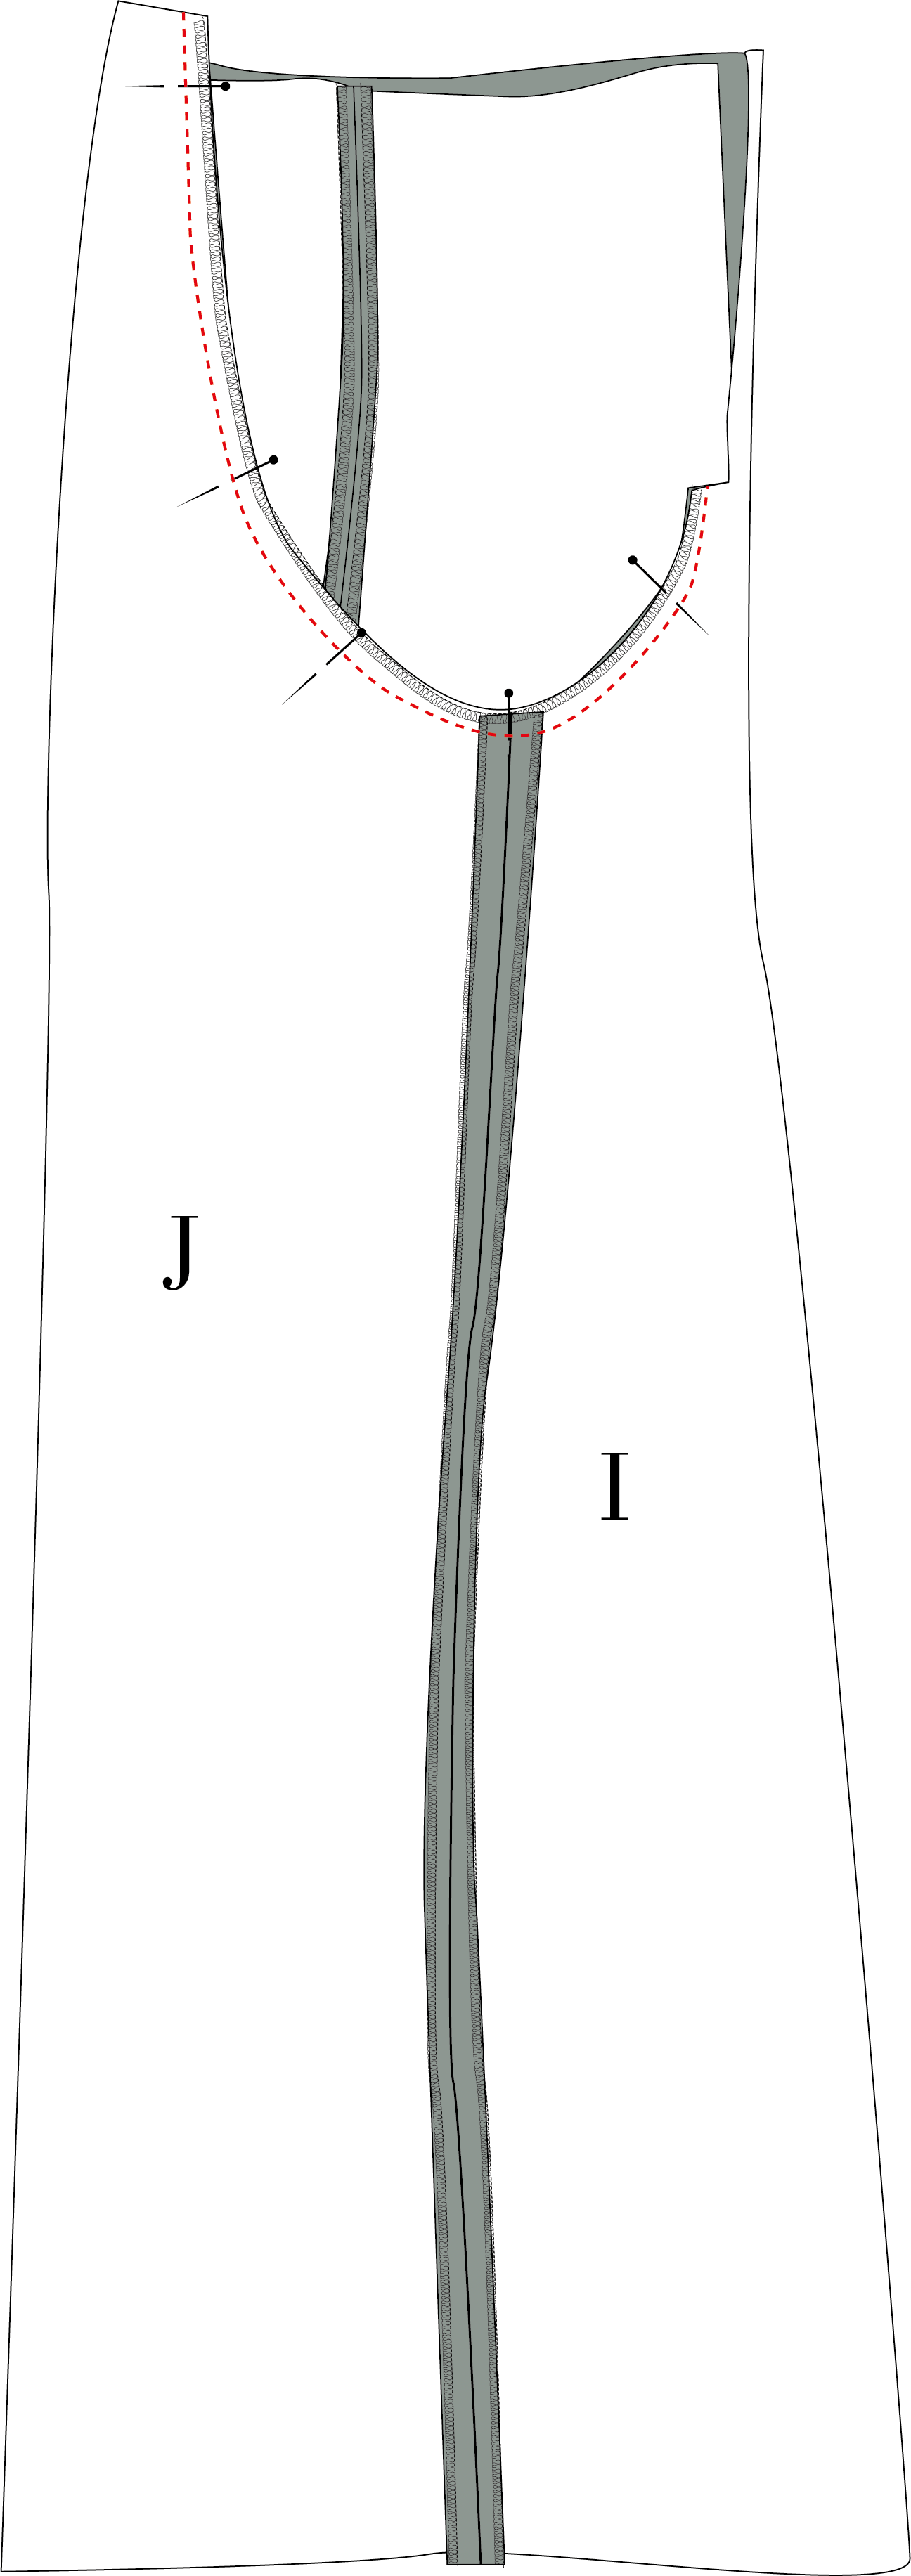
24. Transfer all markings to the pocket pieces and the front piece (I,K,L).
25. Place the pocket welt’s raw edge right sides together at the pocket opening on the front pants (I), aligning markings. Pin together.
26. Place the pocket bag (L) on top of the welt, right sides together, aligning markings.

27. Sew from marking to marking and backstitch.

28. Clip into the corners up to the seam—do not cut into the pocket welt.
29. Rotate the clipped section of the pocketbag and frontpiece so the seam allowances align at the welt ends. The pocket bag and front pants should be 1 cm longer than the folded welt.
Sew the welt ends to the front pants and pocket bag from the side seam to the previous stitching.
Repeat for the other end.

30. Press the welt.
31. Topstitch around the welt on the front pants, 2 mm from the welt edge.

32. Overlock the long edge of the pocket facing (N).
33. Place on the right side of the inner pocket bag (M) and sew along the overlocked edge.

34. Place pocket bag (M) on pocket bag (L), right sides together. Sew together.
35. Finish the pocket seam with overlock, zigzag or binding.

BOTTOM
35. Baste stitch the pocket bag to the waist and side seam allowances.
37. Sew the dart on the back pants (J), right sides together following notches and markings. Press toward center back.

38. Finish the following seams using overlock, binding or zigzag:
Side seams on front (I) and back pants (J)
Inseams on front and back
Crotch seams on front and back

39. Place the front and back piece pieces right sides together and sew along the inseam and the side seam.
40. Press all seams open.

41. Turn one leg right side out and insert into the other. Sew crotch seam. Press open.
42. Place bodice and bottom right sides together at the waist and sew. Align the smocking between the two darts.
43. Finish the seam with overlock, zigzag, or binding and press upward.

PLACKET
44. Sew the placket right sides together along the long edge without notches.
45. Press and under stitch the seam.
46. Sew the second placket as a mirrored piece.
47. On the side without under stitching, fold 1 cm seam allowance to the wrong side and press.

48. Place the right side of the under stitched placket on the wrong side of the garment front, matching markings. The placket extends 1 cm beyond the top edge.
49. Sew the mirrored placket the same way.

50. Clip into the corner of the front pants up to the stitching—do not cut into the placket.

51. Press the seam allowance into the placket.
52. Fold the placket top edge right sides together and sew. The loose placket edge is 1 cm longer than the other.
53. Turn right side out and press neatly.

54. Pin the folded edge over the front seam, covering the original seam. Topstitch 2 mm from the edge down to the clipped corner.
55. Repeat for the other placket.

56. Place the two plackets on top of each other (right side on top), as if closing the garment. Pin together.
57. Pull the ends through the small hole at the bottom to the wrong side.
58. On the wrong side, align the ends with the clipped triangle pointing downward. Sew from corner to corner—do not sew through the front piece.
59. Finish the raw edge with overlock, zigzag or binding.

60. Press the placket from the right side and topstitch the lower edge.
61. Mark buttonhole and button placements.
62. Sew buttonholes and buttons according to the markings or preferences. The buttonholed are vertical.

HEMMING
63. Finish the hem of the pant legs with overlock, zigzag or binding.
64. Fold and press the hem up 5 cm, wrong sides together.
65. Hem by sewing 4.5 cm from the edge or use invisible hand stitches like catch stitch.

STRAPS
66. Adjust the strap length to fit and sew them to the back edge on each side of the smocking.
67. Trim strap to 2 cm longer. Finish the end with overlock or zigzag.

BELT
68. The belt can be made with a buckle or as a tie belt.
69. Measure and determine your desired belt length before sewing.
70. Fold the belt lengthwise, right sides together.
71. Sew from the first notch to the corner at the fold. Sew from the second notch across to the second corner.
72. Trim corners.
73. Turn the belt right side out through the ends.
74 Press and close openings with hand stitching.
75. Optionally, topstitch 5 mm from the edge.

75. Sew on a belt buckle if desired.

