

You will need:
Fabric width 120 cm
EU 32–38 / UK 4–10 / US 0–6: 1.45 m
EU 40-48/UK 12-20/US 8-16: 1.80 m
EU 50–54 / UK 22–26 / US 18–22: 2.00 m
Fabric width 140 cm
EU 32–38 / UK 4–10 / US 0–6: 1.40 m
EU 40-48/UK 12-20/US 8-16: 1.50 m
EU 50–54 / UK 22–26 / US 18–22: 1.60 m
Interfacing 0.35 m
Stay tape 1.3 m
Thread
Invisible zipper, 60 cm
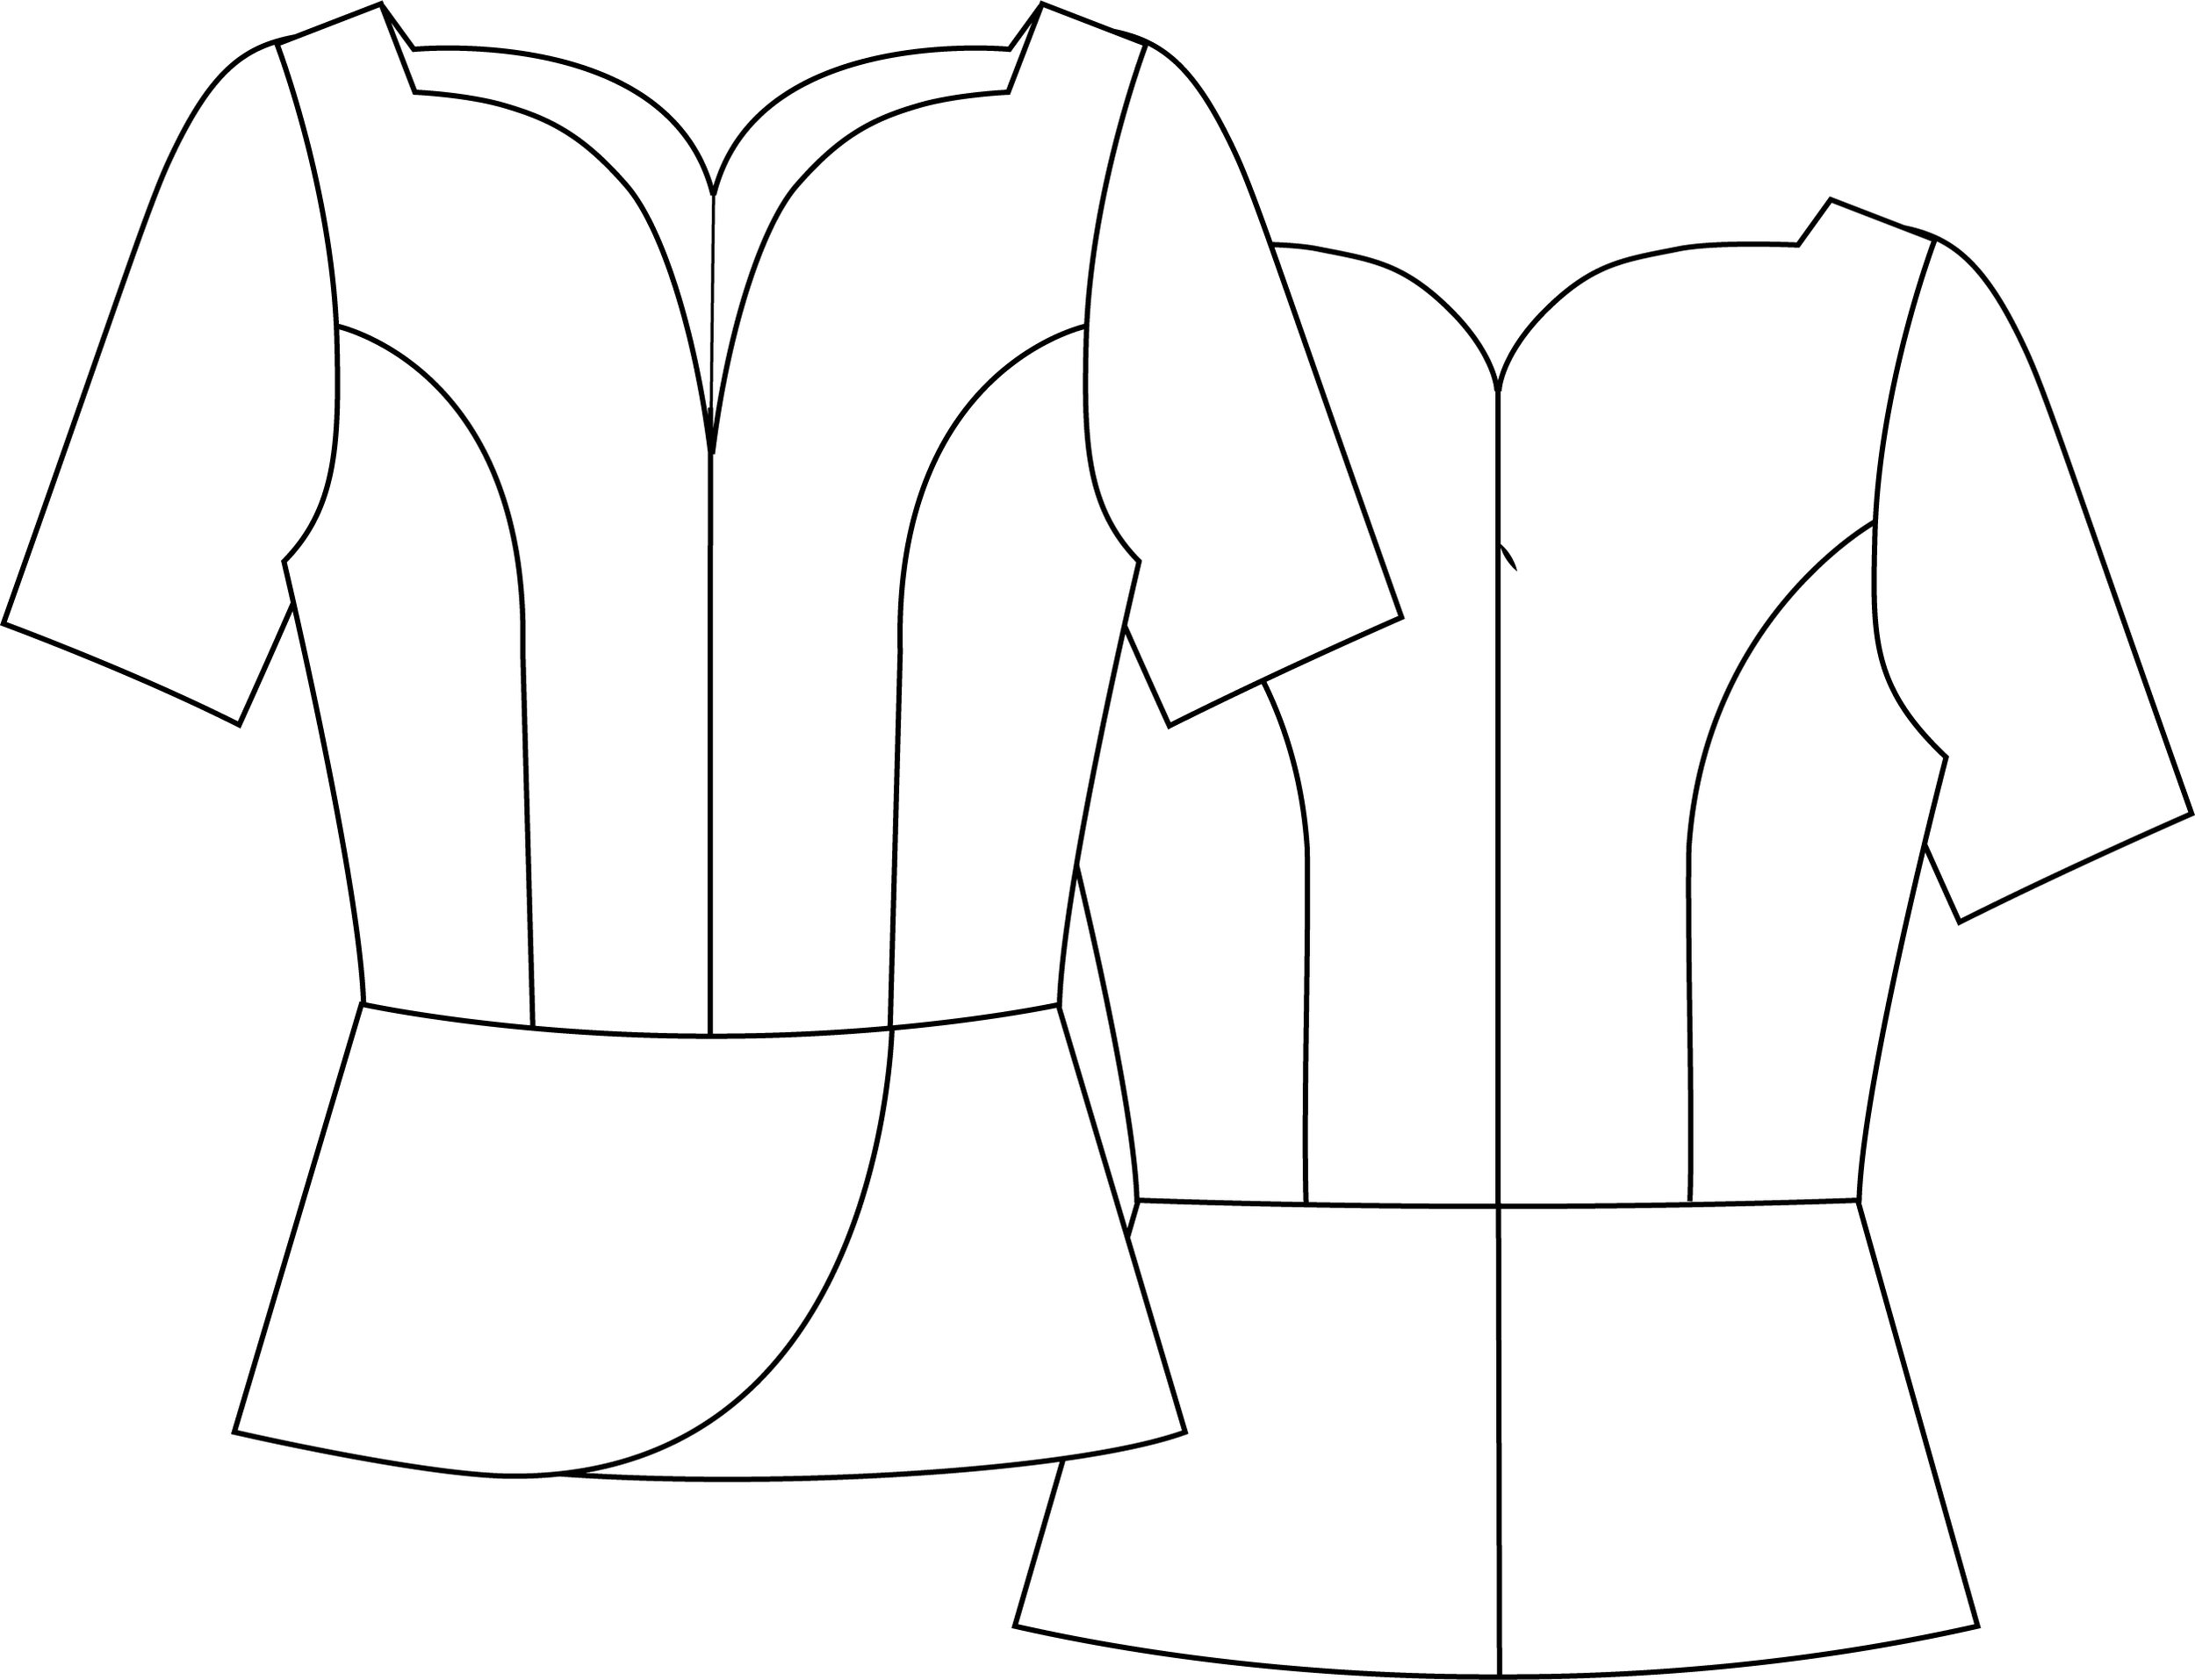
No. 36 Monaco - Version 2
Blouse with a curved peplum hem and an elegant neckline. The blouse is shaped with princess seams on both the front and back and features three-quarter length sleeves.
Fabric choice:
Medium to heavy weight woven fabric. Wool, Linen, cotton or heavy silk. The final look of the garment will depend on the type of fabric you choose. The fabric should preferably have a certain degree of stiffness, so the curves of the neckline can “stand on their own” without collapsing. Not suitable for jersey.
Find Your Size:
Take your measurements according to the measurement chart. Choose the size closest to your measurement. Print the measurements chart here.

Fitting:
We recommend that you always make a muslin before you cut the fashion fabric, to make sure your finished garment will fit you perfectly.
Cutting Fabric
On each pattern piece, you will find a capital letter. On the cutting layout plan, you will find the same capital letters so that you can easily see which pattern pieces to use for the view you have chosen.

YOU WILL NEED THE FOLLOWING PATTERN PIECES:
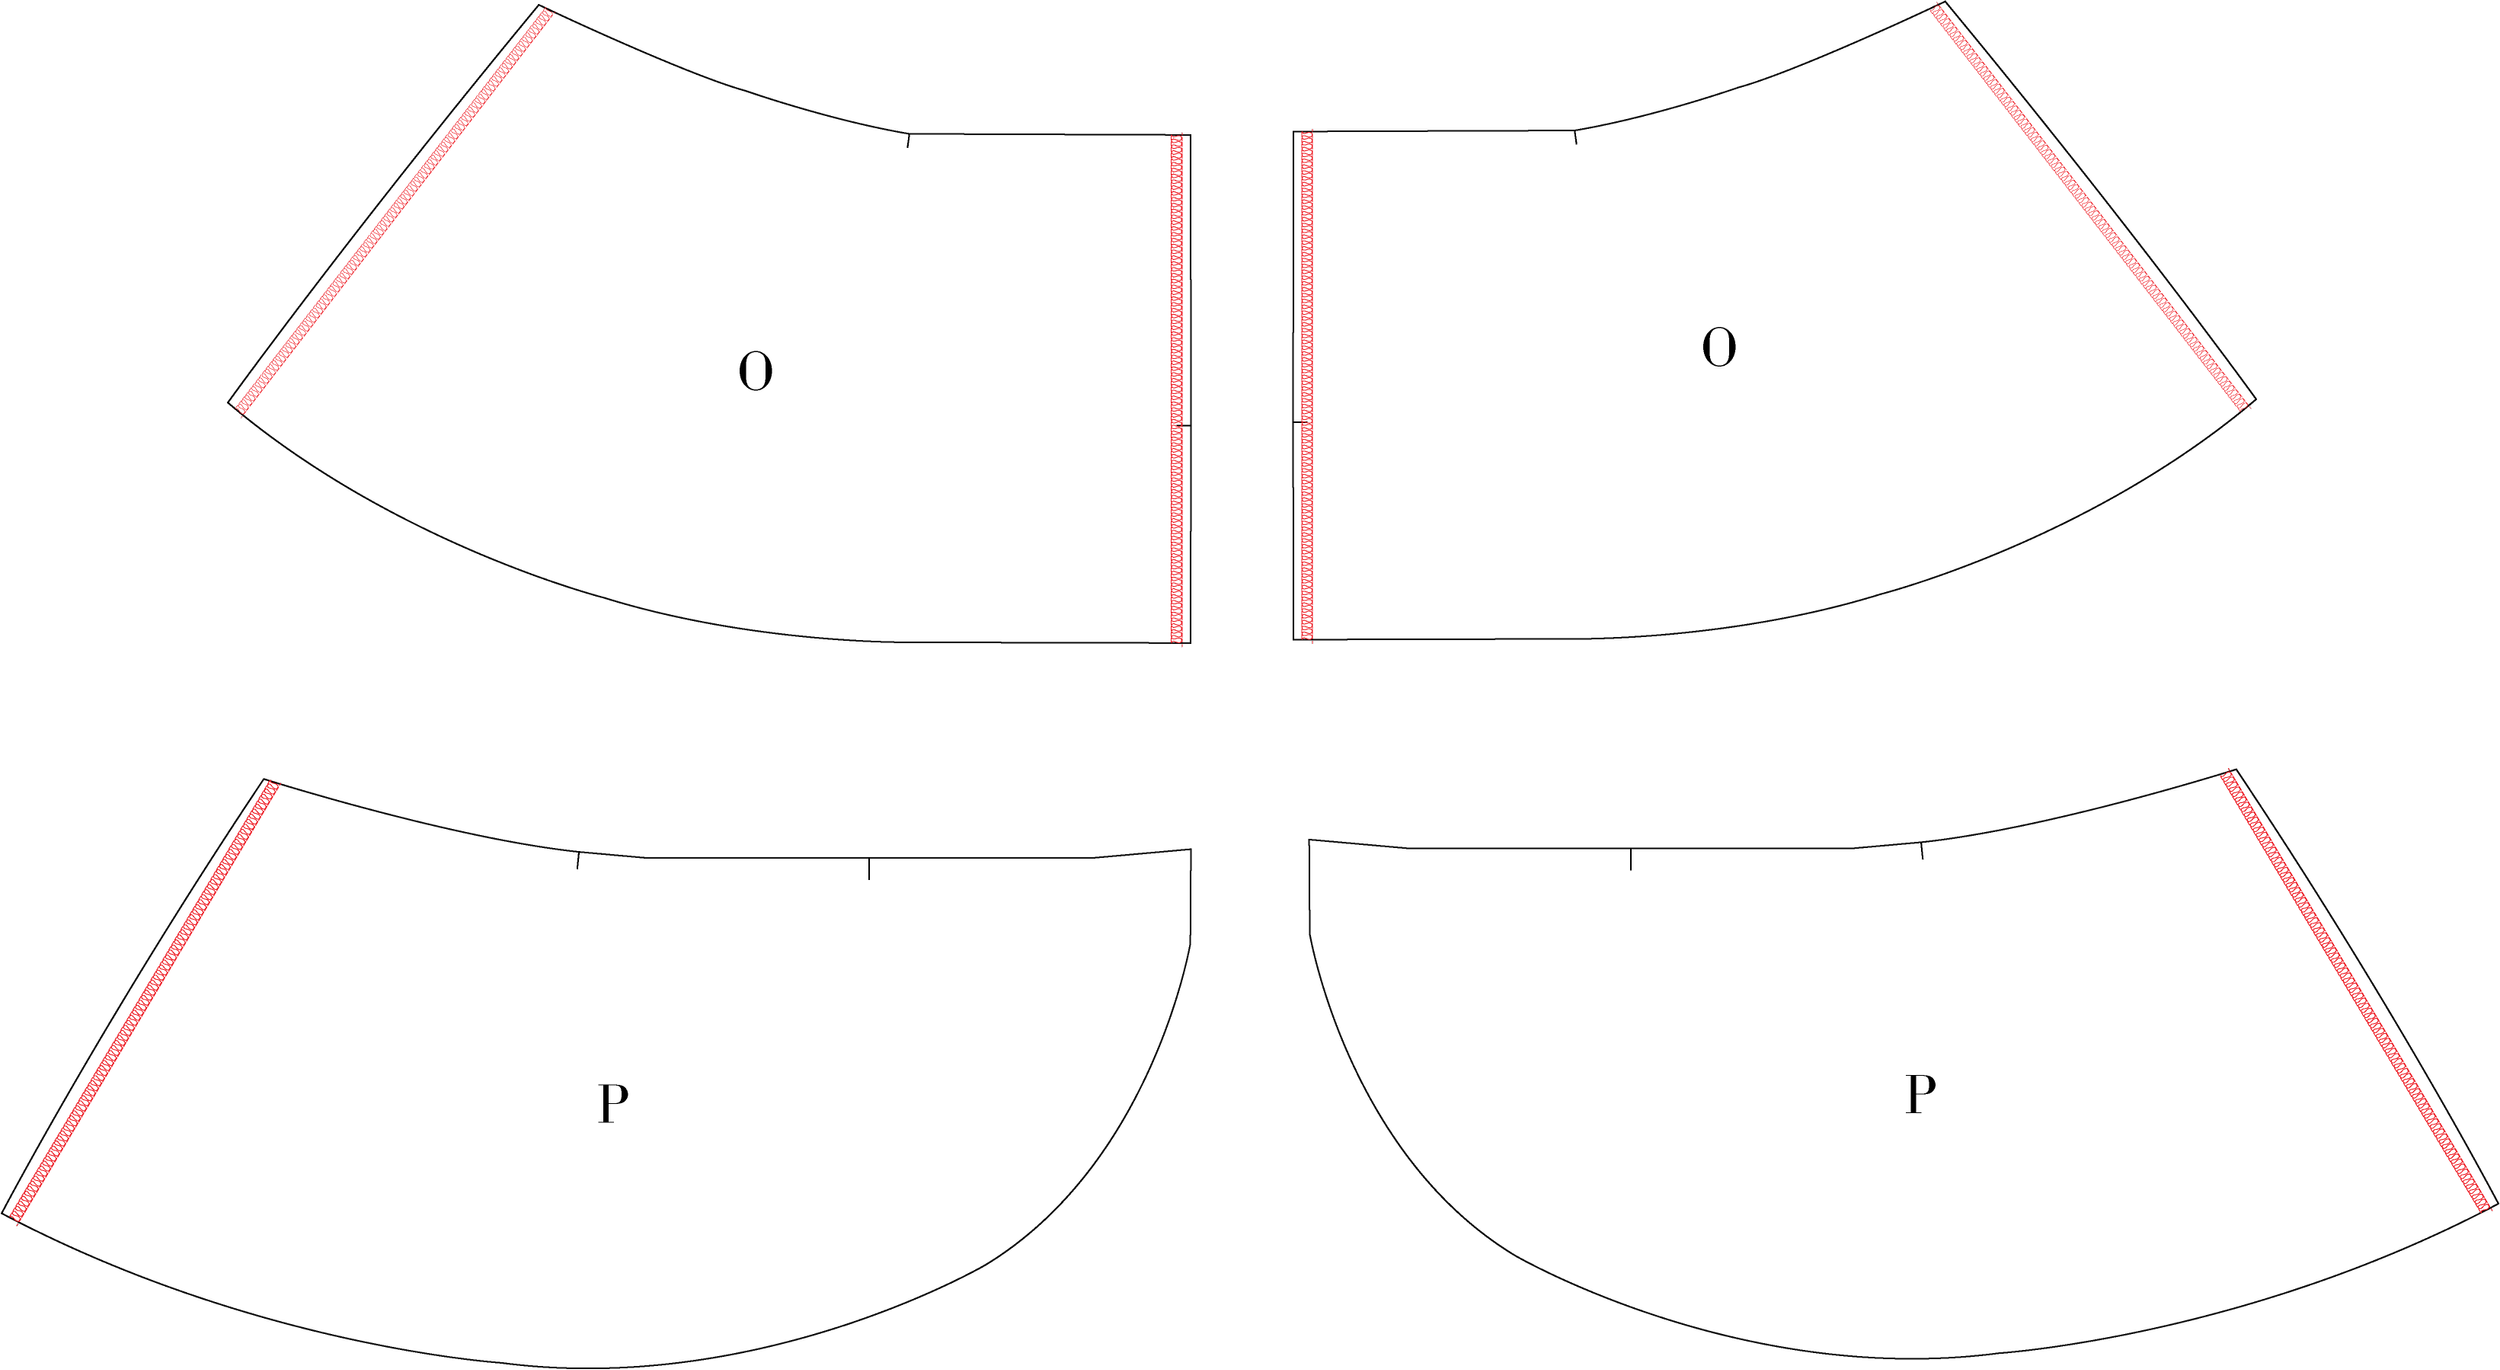
A, B, D, E, F, G, O, P

Sewing
NOTE! The Pattern Has 1 Cm Seam Allowances Included Unless Otherwise Noted.
PREPARATION
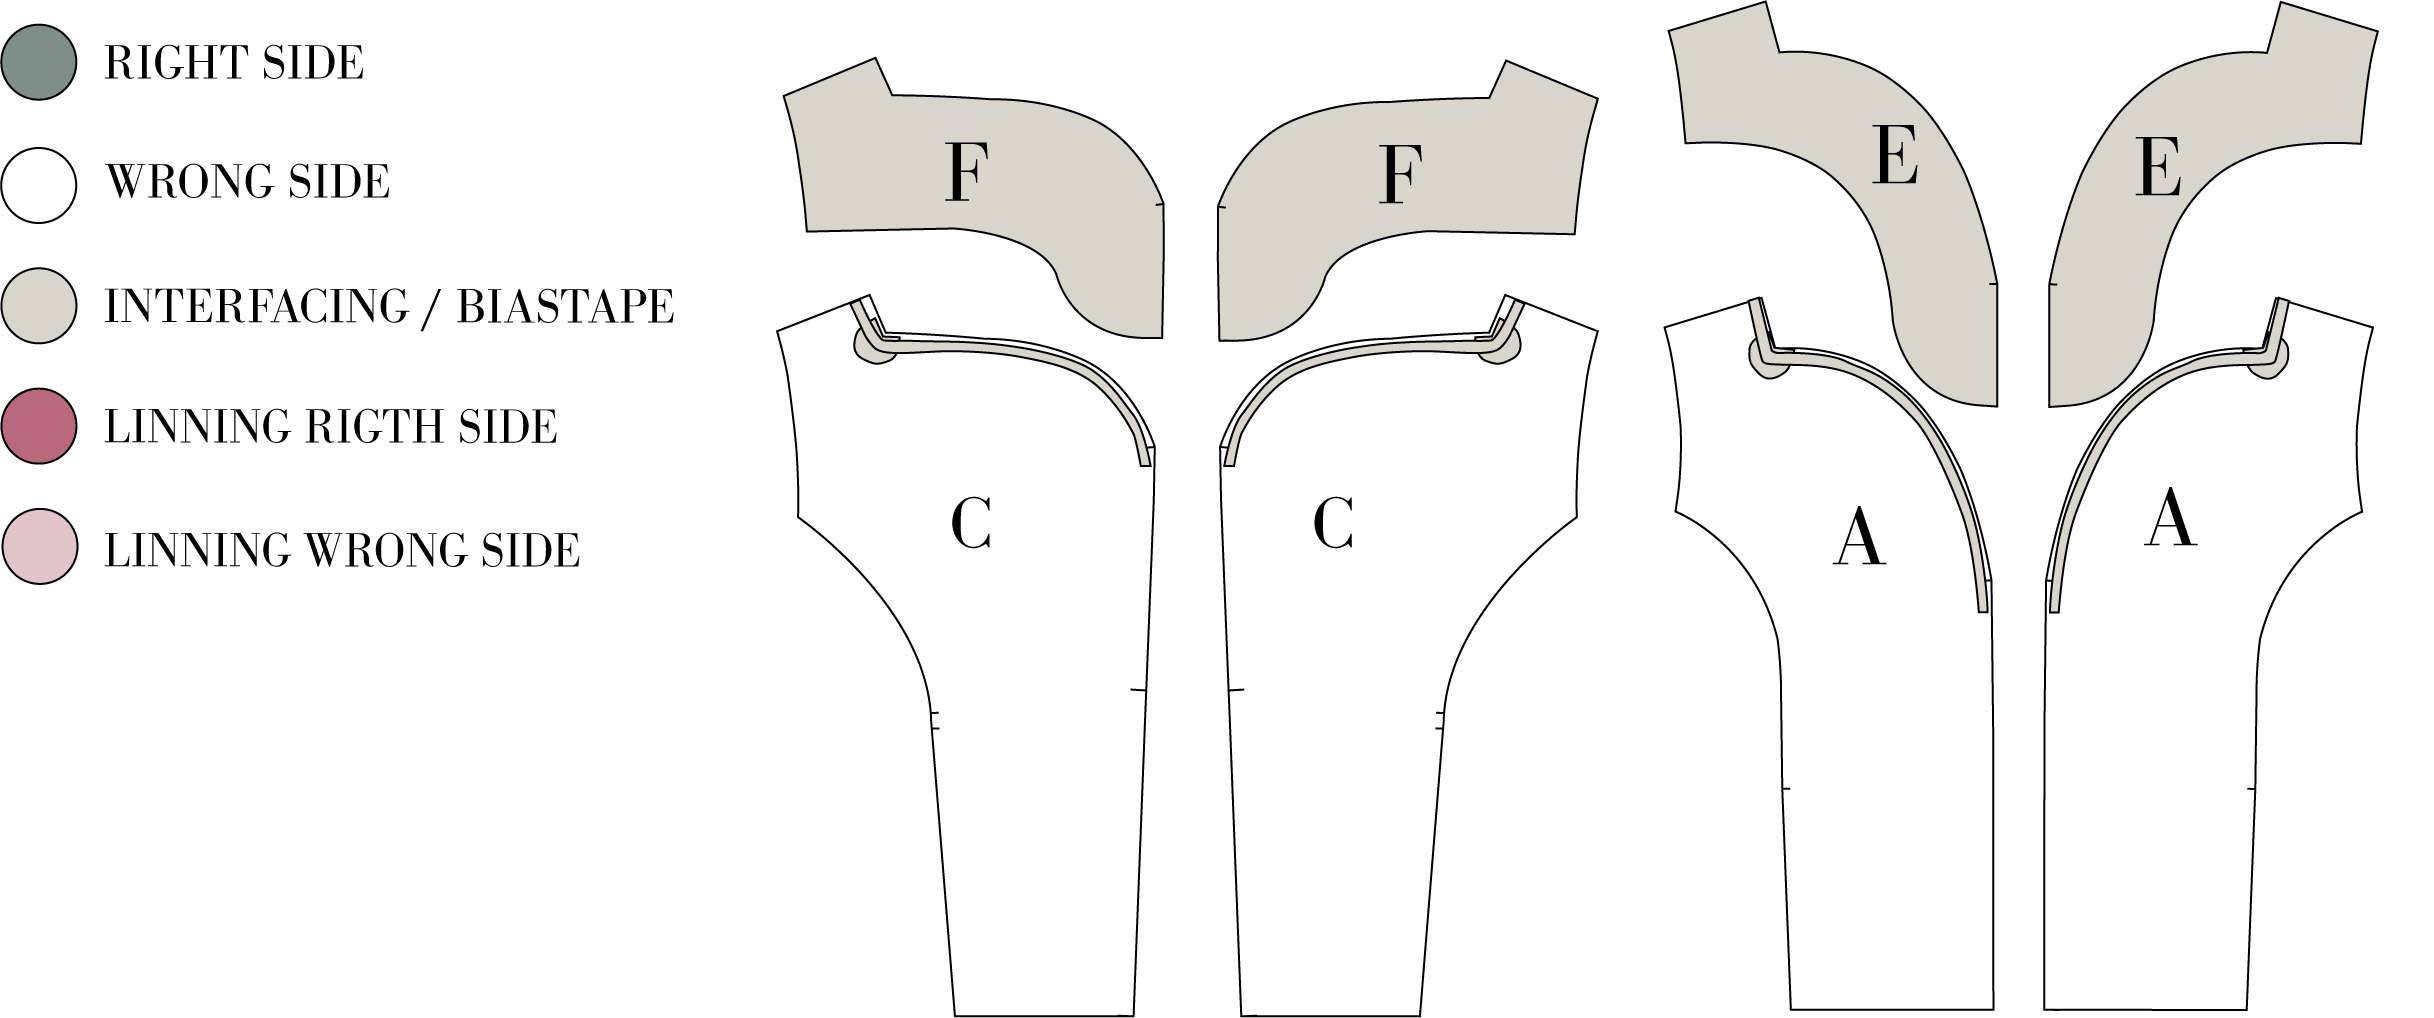
1. Cut all pattern pieces in fabric and interfacing. Remember to transfer all notches and markings.
2. Press interfacing to the front and back neck facings (E, F).
3. Press a small piece of interfacing at the corners indicated on the front and back bodice (A, C).
4. Apply stay tape to all curved edges of the neckline on the front and back bodice (A, C).
BODICE
5. Sew the center front seam of the front neck facing (E), right sides together. Sew from the bottom up to the notch.
6. Sew the center back seam of the back neck facing (F), right sides together. Sew from the bottom up to the notch.
7. Sew the shoulder seams of the neck facings, right sides together.
8. Press all facing seams open.

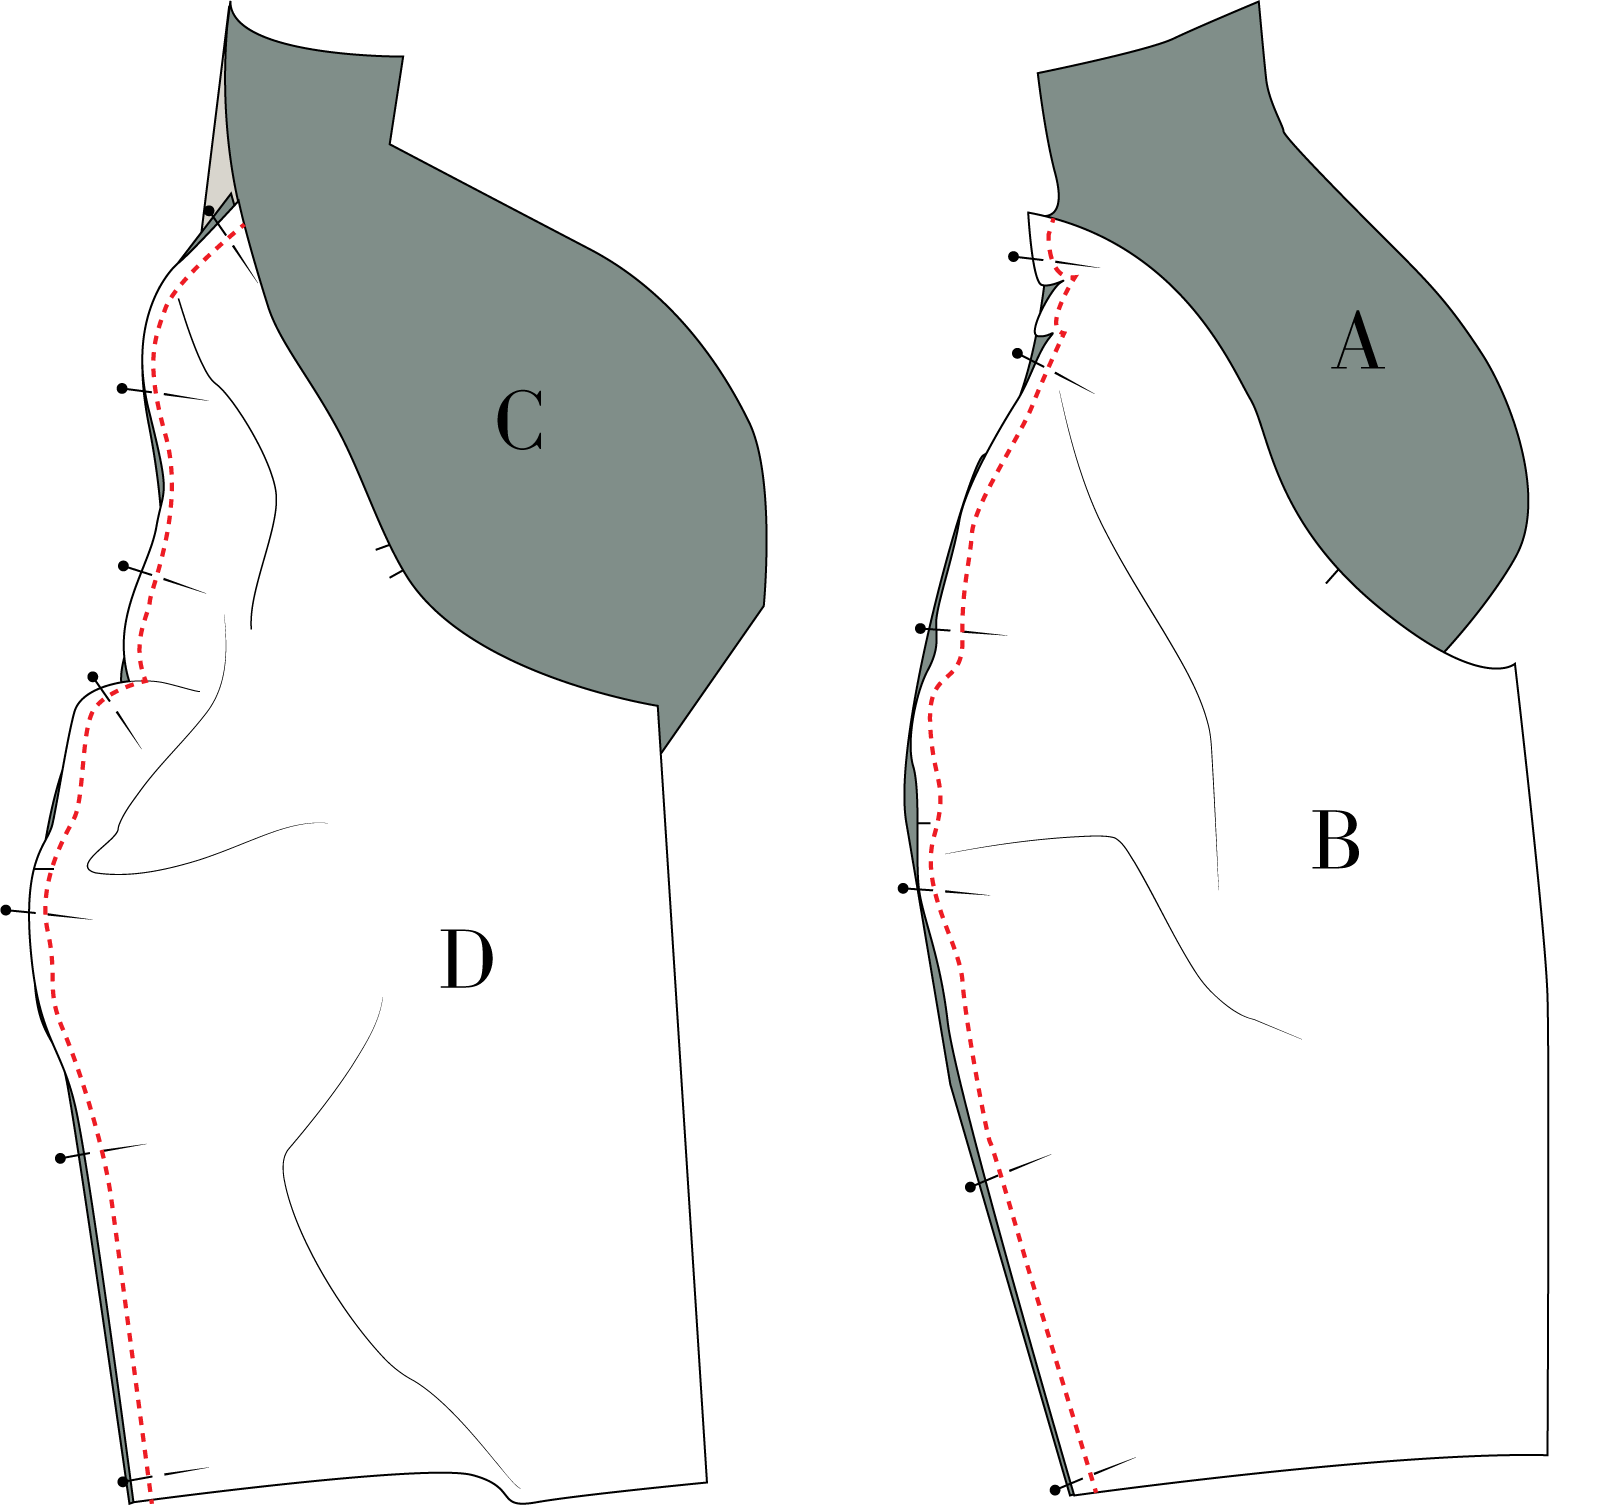
9. Place the front side bodice (B) right sides together with the front bodice (A) and sew the seam.
10. Place the back side bodice (D) right sides together with the back bodice (C) and sew the seam.
11. Press all seams toward the side seams.
12. Finish the edges of the following pieces (using overlock/serge, zigzag, or binding):
Long edge of the front neck facing
Long edge of the back neck facing
Sleeve inseams
Center front seam
Center back seam
Side seams
Front side seam (all layers together)
Back side seam (all layers together)

13. Sew the center front seam, right sides together, from the bottom up to the notch before the curve.
Note: Remember to backstitch at the end.
14. Sew the center back seam, right sides together, from the middle notch up to the notch before the curve.
Note: Remember to backstitch at the end.

15. Place the front bodice right sides together with the back bodice. Sew the side seams and shoulder seams.
16. Press the seams open.
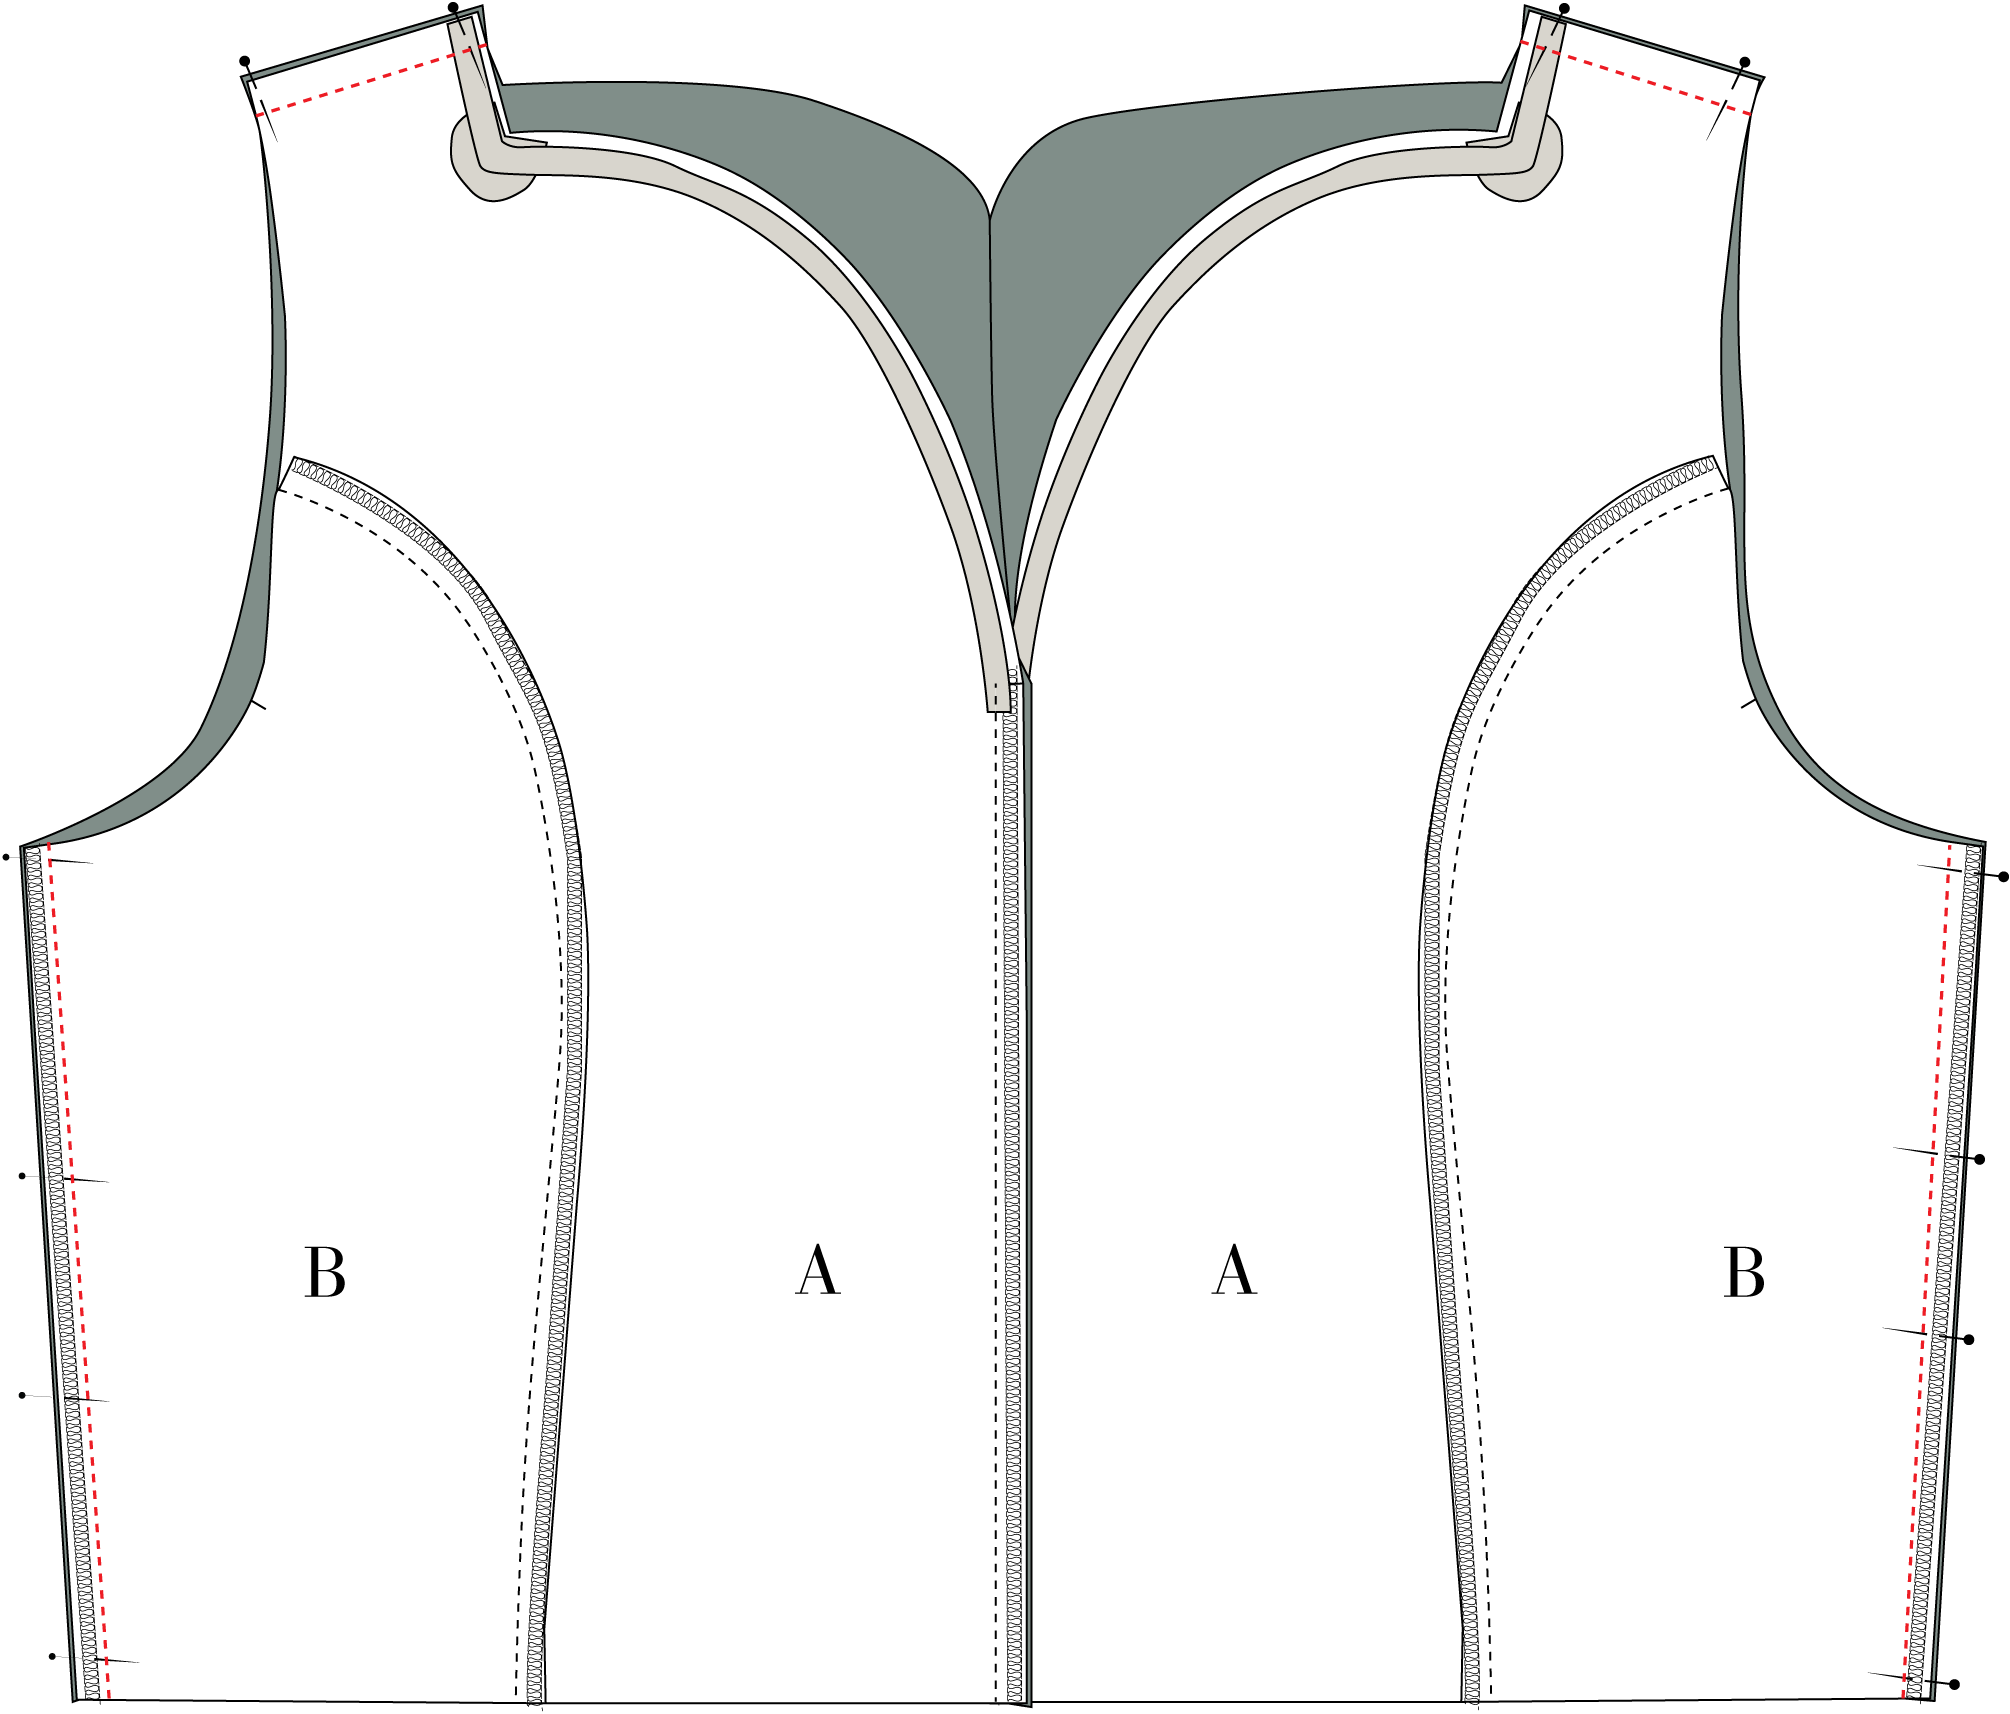
17. Place the neck facing onto the neckline of the bodice, right sides together. Match all seams carefully. First sew the right side of the neckline, then the left side as follows:
Pin the facings and bodice together at center front, folding the center front seam allowances aside on both facing and bodice. Do not catch this seam allowance in the neckline seam. Repeat at center back. Stitch from center front to center back.
Repeat the process for the left side of the neckline.
Now the entire neckline is sewed, and the seam allowances at center front and center back remain free from the neckline seam.

18. Clip into each corner at the shoulders.
19. Clip V-notches around the curves of the neckline on both front and back bodice.

20. Understitch the facing: first along the right side of the neckline, then along the left side.

21. Press the neck facing to the inside of the bodice.
22. Tack the facing to the seam allowance at center front and center back.
23. Baste the facing to the seam allowance at the armholes.

SLEEVES
24. Sew the sleeve seam, right sides together. Press the seam open.

25. Finish the raw edge of the sleeve hem with overlock/serge, zigzag, or binding.
26. Fold and press the hem allowance up by 4 cm (1 5/8”). Stitch in place 3.5 cm (1 3/8”) from the edge, or slipstitch by hand for an invisible finish.

27. Set in the sleeves: place sleeve right sides together with the armholes and sew.
28. Finish the seam allowances with overlock/serge, zigzag, or binding.
PEPLUM & ASSEMBLY
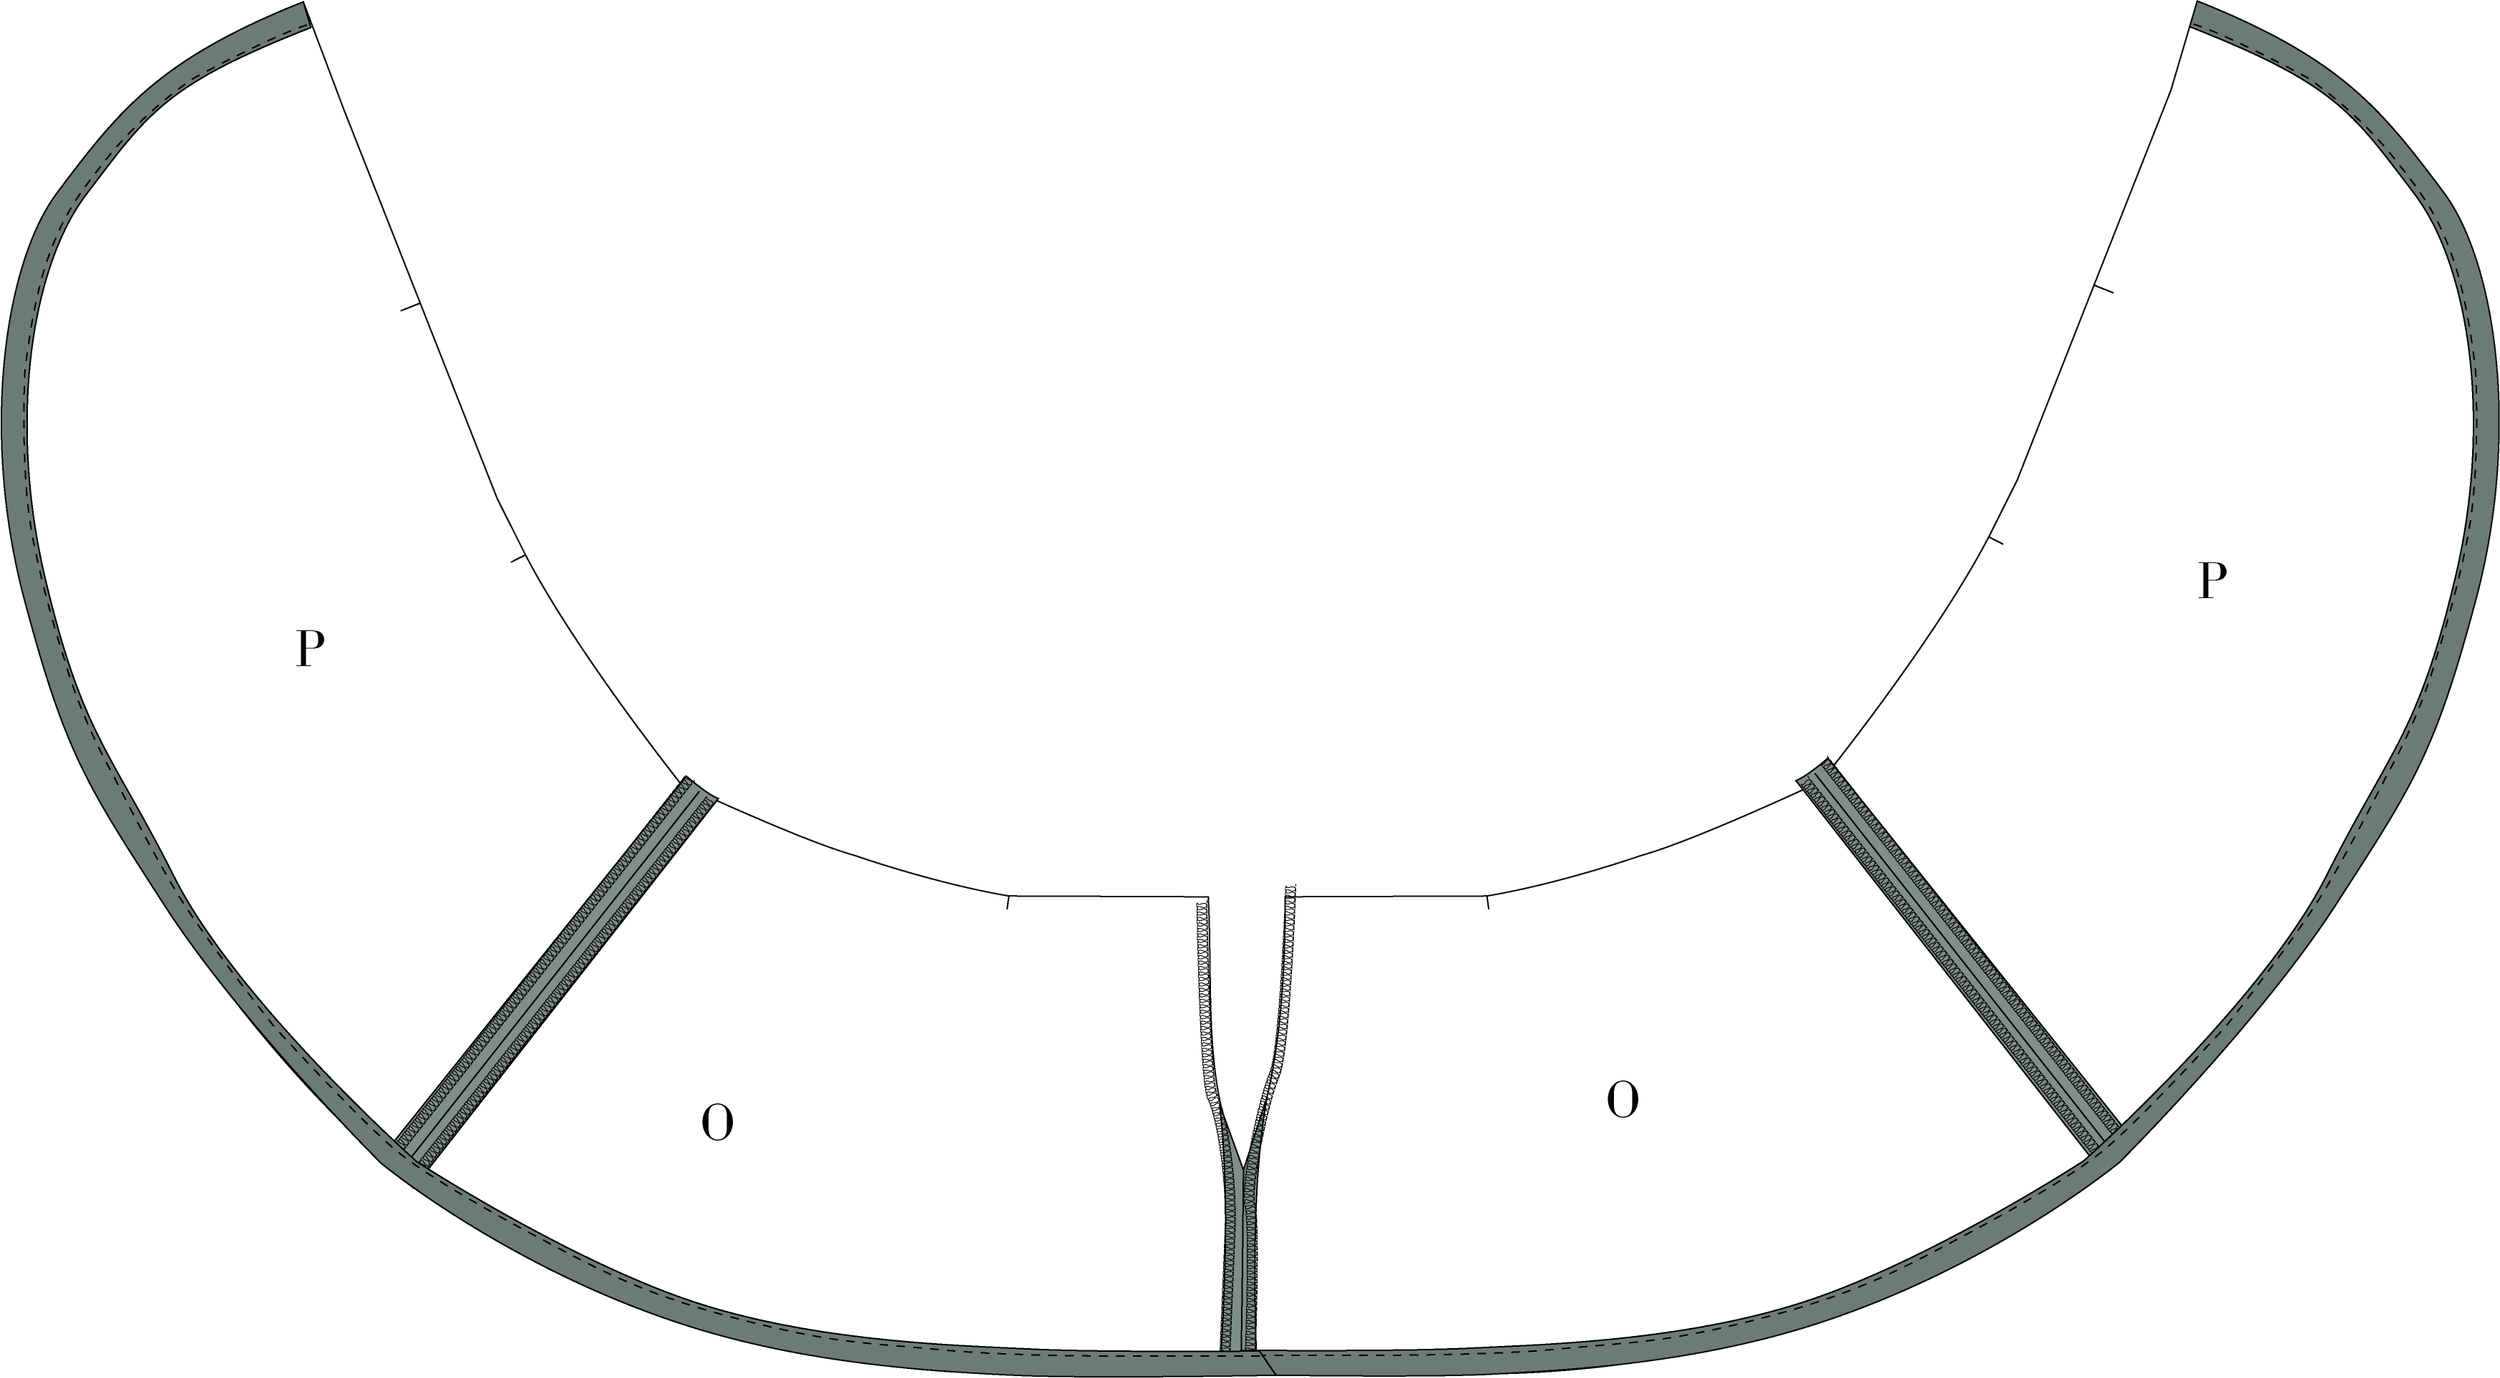
29. Start by finishing the side seams of the front and back peplum (O, P), as well as the center back seam, with overlock/serge.
30. Sew the side seams, right sides together.
31. Sew the center back seam, right sides together, from the hem up to 2 cm before the notch.
32. Press all seams open.

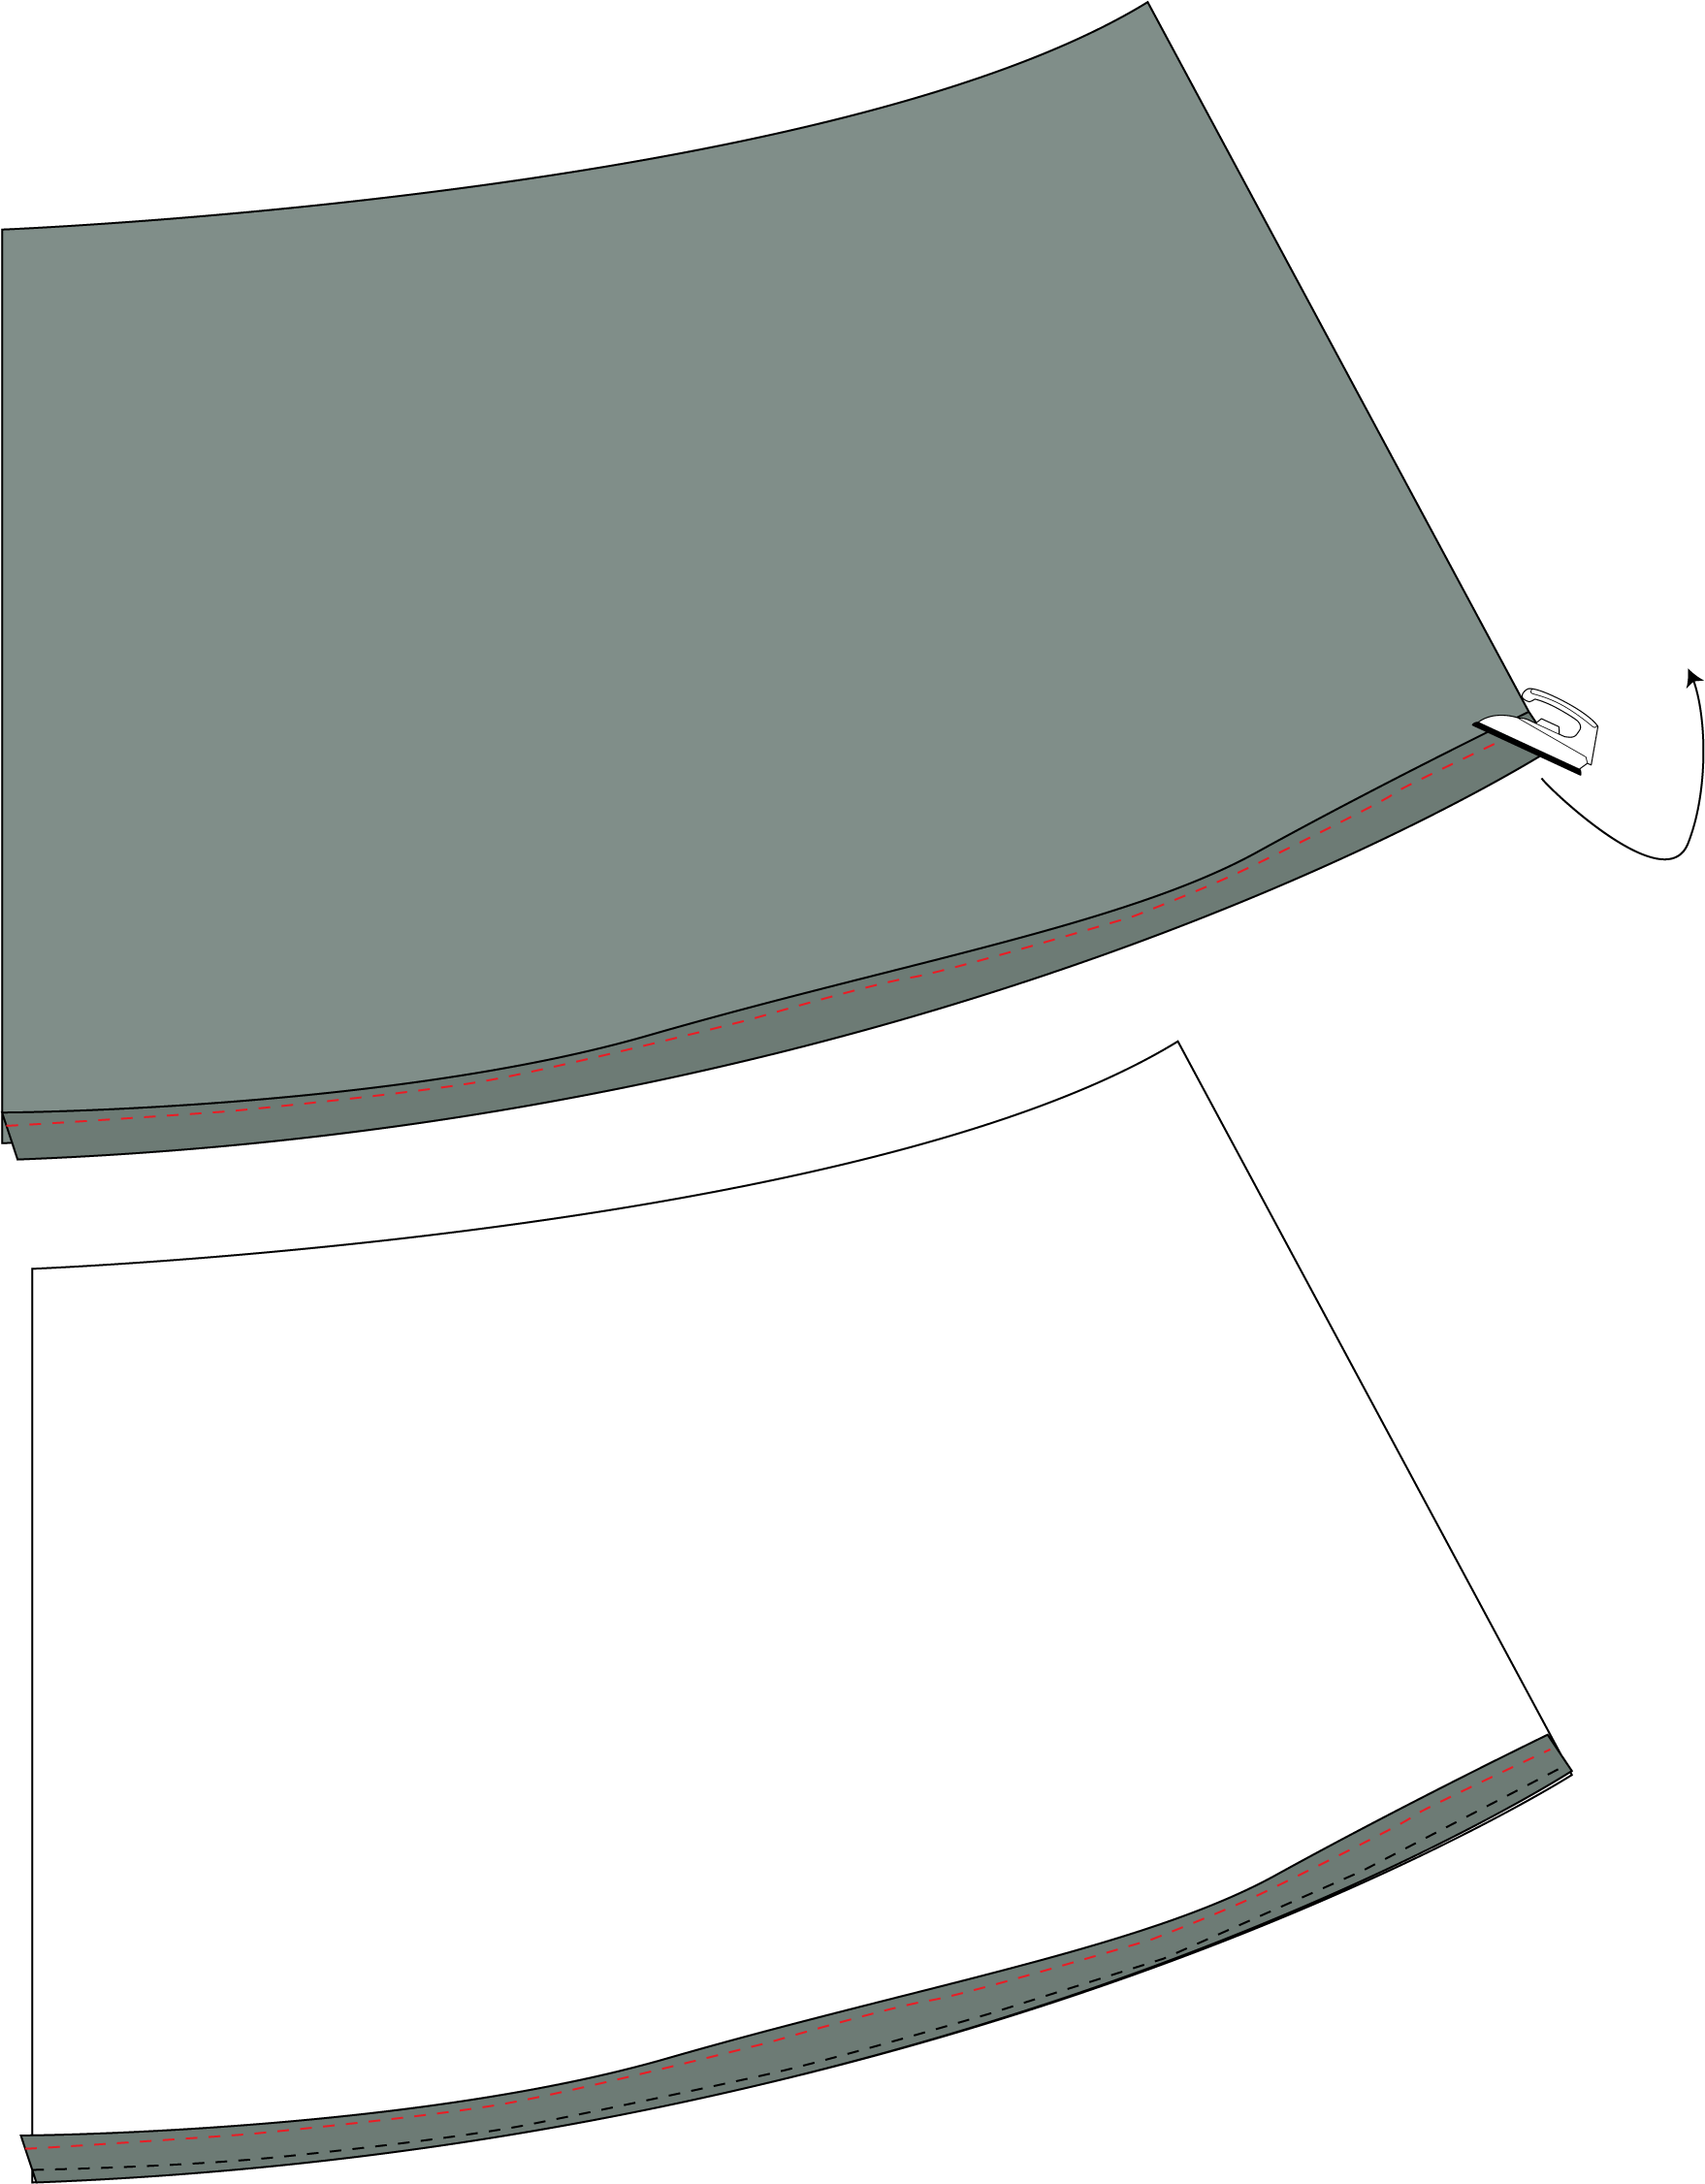
Bias Binding Finish for Hem (see guide)
33. Cut a bias strip 4 cm wide and approx. 2 meters long in a lightweight fabric.
34. Fold and press the bias strip lengthwise so it becomes half the width.
35. Place the raw edge of the folded bias strip right sides together along the hem edge of the peplum.
36. Stitch with a 1 cm seam allowance.
37. Trim seam allowance to 0.5 cm.

38. Understitch the bias strip 0.2 cm from the seam.
39. Press the bias strip to the wrong side and stitch along the folded edge.
PEPLUM ASSEMBLY
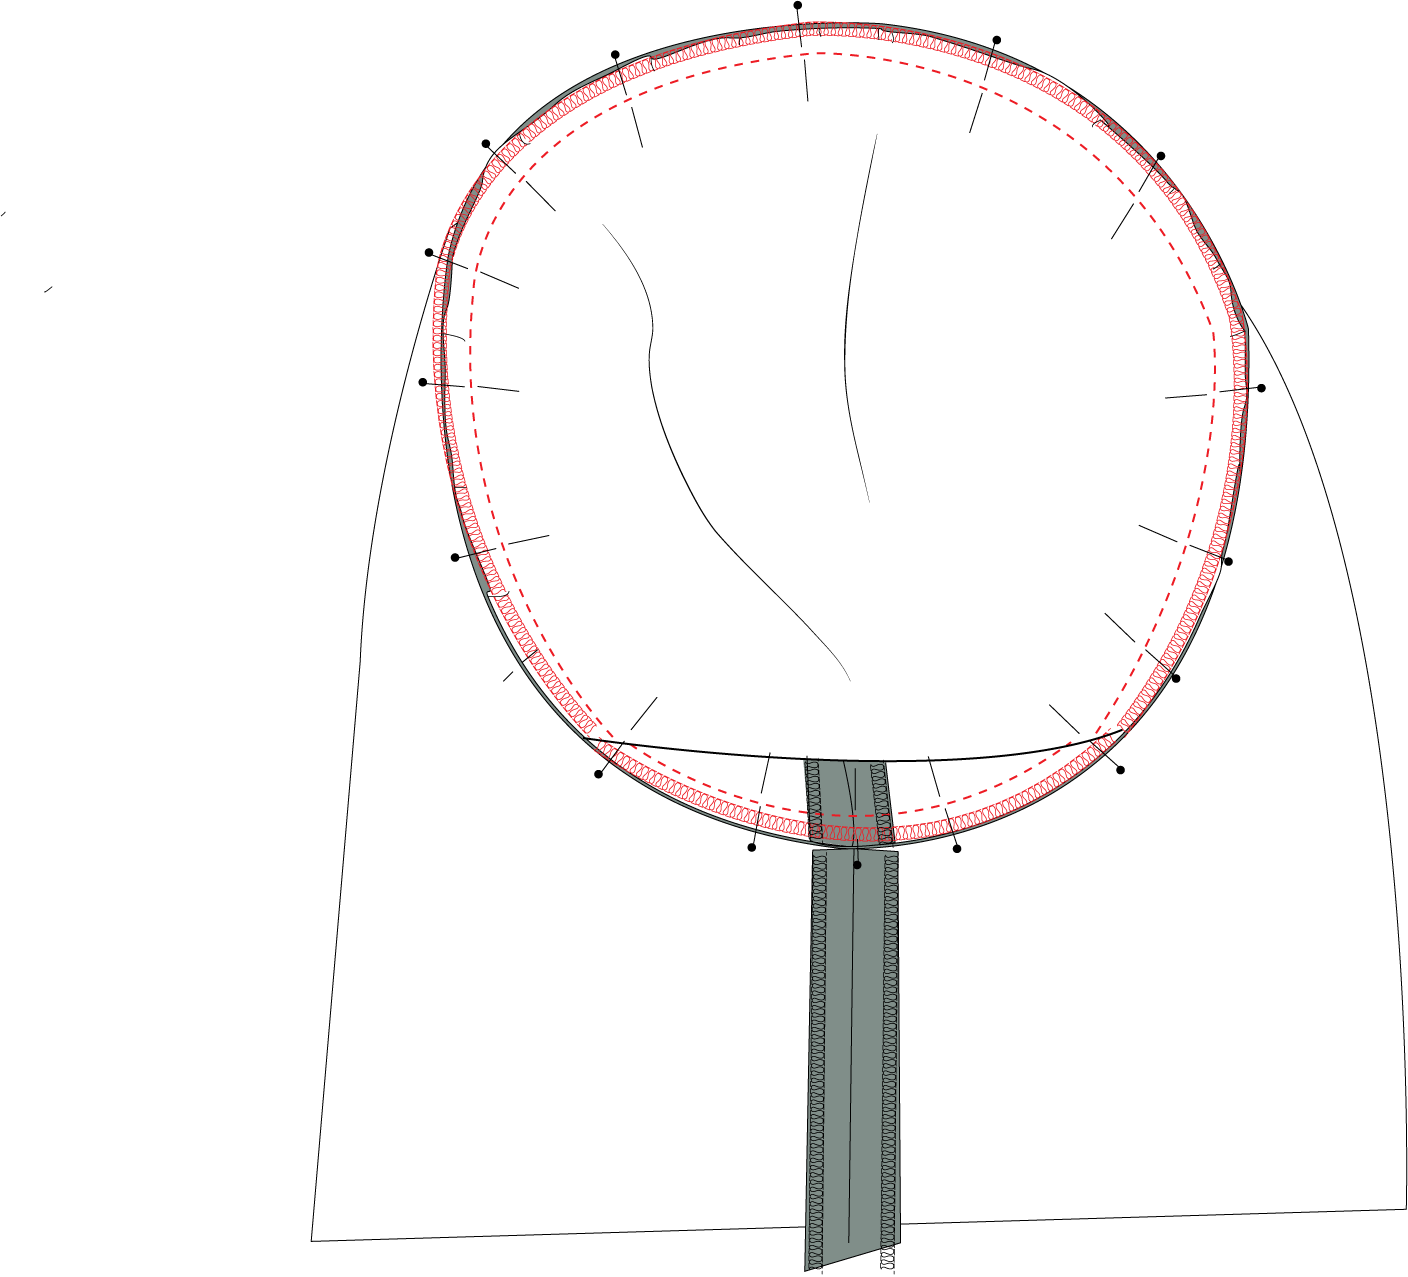
40.Place the two front peplum pieces on top of each other so the center front notches align, and the ends match the second notch. The right front piece should be on top.
41. Baste the layers together within the seam allowance.

42. Join bodice and peplum: place the bodice waistline right sides together with the peplum waistline and pin.
43. Sew the waist seam. Finish the seam allowance with overlock/serge, zigzag, or binding.
44. Press the seam allowance upwards.

ZIPPER (video)
45. Place the right side of the invisible zipper along the opening edge at center back.
46. Baste the zipper to the dress, starting at the top of the bodice and down to the notch on the peplum.
47. Baste the other side of the zipper. Make sure the waist seam lines up perfectly when positioning the zipper.
48. Fold the zipper teeth aside and stitch close to the teeth. This can be done with a regular presser foot or an invisible zipper foot.

49. Sew the remaining section of the center back seam below the zipper, right sides together. Press the seam open and carefully press around the zipper area.

